build
Sensor Application Conformance Test Bench
Introduction and Objectives
Semtech’s Sensor Application Conformance Test Bench (“Test Bench”) is an all-in-one package designed to help you to create tests that can be used to verify the functionality of your LoRa®-based devices. For instance, you can use the Conformance Test Bench to build tests for pre-certifying your sensors. The package consists of both hardware and extensible testing software, including an easy-to-use interface for reporting and understanding test results.
Note: This document assumes that you are familiar with Raspberry Pi development and have a working knowledge of HTML and Python.
Features
The Test Bench can be used in the following ways:
- To test or qualify both the MAC and application layers
- To verify the quality of the following aspects of your application:
- LoRaWAN® MAC implementation, basic functionality
- LoRaWAN MAC implementation, robustness
- Sensor application layer design
- Sensor application layer robustness
- Power consumption during operation in a given including, but not limited to, transmission, reception sleeping
Note: Power measurements require proprietary hardware; supplies are limited
Additionally, the Test Bench can be used to build tests that check the following types of functionality:
- Over-The-Air Activation (Pre-joining behaviors)
- MAC Command Verification (The response of the device under test (DUT) to typical MAC commands from the network)
- Normal Operation (The normal operation, power consumption, and stability of the DUT)
- Application Layer Robustness (The behavior of the DUT in the event of a high packet error rate (PER), frequency-selective channels, and other corner cases)
The Test Bench supports test interruption and recovery. Because tests can take a long time to run, the Test Bench can recover from its previous state if there is a power or internet outage. It also supports testing multiple devices at the same time.
Use this guide to run tests with the Test Bench. If you want to expand the Test Bench with additional test cases, we strongly recommend that you read the design document, Sensor Application Conformance Test Bench: Test Bench Design , before doing so.
Getting Started
To begin, set up the hardware. We recommend using a Raspberry Pi microcomputer as the Test Bench host. You can, however, use other Linux-based hosts. However, using other Linux-based hosts is beyond the scope of this document.
Due to the system cache requirements, we recommend a minimum of 512 Mb of RAM. If you use a Pico gateway as the concentrator, you must use a full-size USB-A port.
Hardware Components
The following table lists the Test Bench hardware components.
| Component | Description | Key Specification |
|---|---|---|
| LoRa Concentrator | Pico GW Reference Design | SX1308, 8 channel |
| Host | Raspberry PI 3 Model B+ | 1.4 GHz quad-core CPU, Wi-Fi, BLE, Ethernet |
| ADC | Part Number: ADS1256 | 8 channels, 24-bit resolution |
| Current sensing board3 | Proprietary, Semtech-designed board4 | 3 gain levels, ranging from 1 uA to >200 mA |
Set Up the Hardware
We used a Raspberry Pi 3 Model B+ for the example in this section. In addition, we incorporated two additional PCBs connected to the hardware platform.
- An ADC board with a TI ADS1256 ADC chipset
- A current-sensing board, with an analog operational amplifier (OpAmp) on-board (to amplify the voltage signal)
1. We used and tested Raspberry PI 3 Model B+. This Test Bench has not been tested using Raspberry Pi 4.
2. To purchase hardware, visit:
- RASPBERRY PI 3 MODEL B+ (Digi-Key)
- Daughter Card - Seeed Technology 114990831 (Digi-Key)
- Data Conversion IC Development Tools - Seeed Studio 114990831 (Mouser)
- Arm Development Board - Seeed Studio 114990584 (Mouser)
- Evaluation Kit - Semtech (Digi-Key)
- SX1304 Gateway - Semtech (Mouser)
3. The current sensing board is an optional component. The Test Bench will function without this feature.
4. The reference design for this can be found at https://github.com/Lora-net/CTB/tree/master/Hardware/V2
Instructions
- Stack the ADC board on top of the host board.
- Make sure that all GPIO pins are connected correctly.
- Use jumpers to connect the VCC and VREF to five volts.
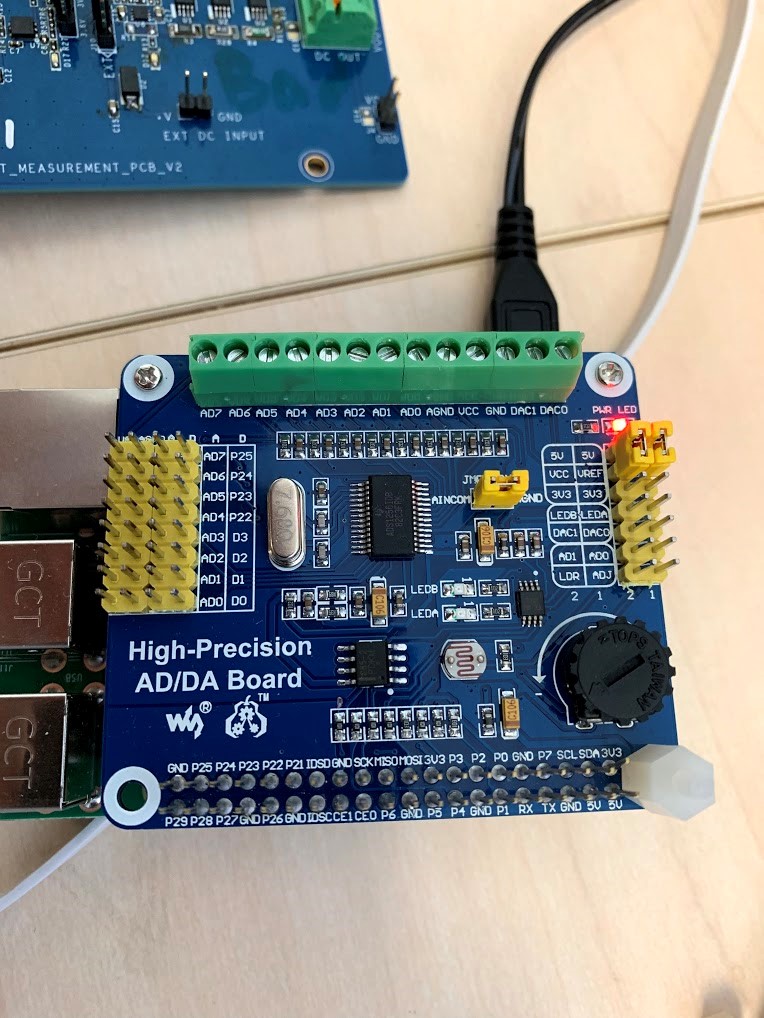
Figure 1: Jumper configuration on the ADC board
- Stack the current-sensing board on top of the ADC board, making sure that all 32 pins are connected correctly.
- Select LDO on jumper J11 on the current-sensing board, and select the correct output voltage on jumper J10.
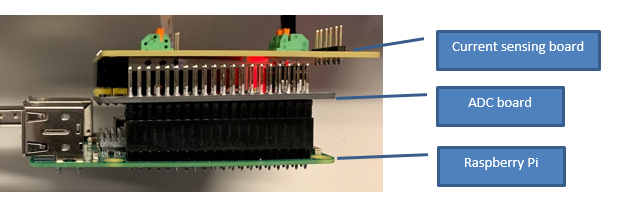
Figure 2: Side view of the hardware connection of the three components
- Connect the gateway:
- If using a Semtech Pico gateway:
- Connect it using any of the host USB ports.
- Install a matched antenna to the SMA port.
- If using a different gateway:
- Make sure that the gateway supports the Semtech packet forwarder.
- If there are multiple packet forwarder options, configure the gateway to use the standard Semtech UDP packet forwarder.
- To use an external gateway, make sure that the packet forwarder address is configured to be the same as the Test Bench host IP address. Also make sure the up and down ports follow the corresponding fields (serv_port_up, serv_port_down) in the config.json file. The default port is 1690.
- Make sure the gateway is turned on and has network access to the Test Bench host.
- If using a Semtech Pico gateway:
- Connect an Ethernet cable to the host board. This Ethernet connection should provide connectivity to the Internet or a network server.
- Connect the micro-USB power supply to the host board.
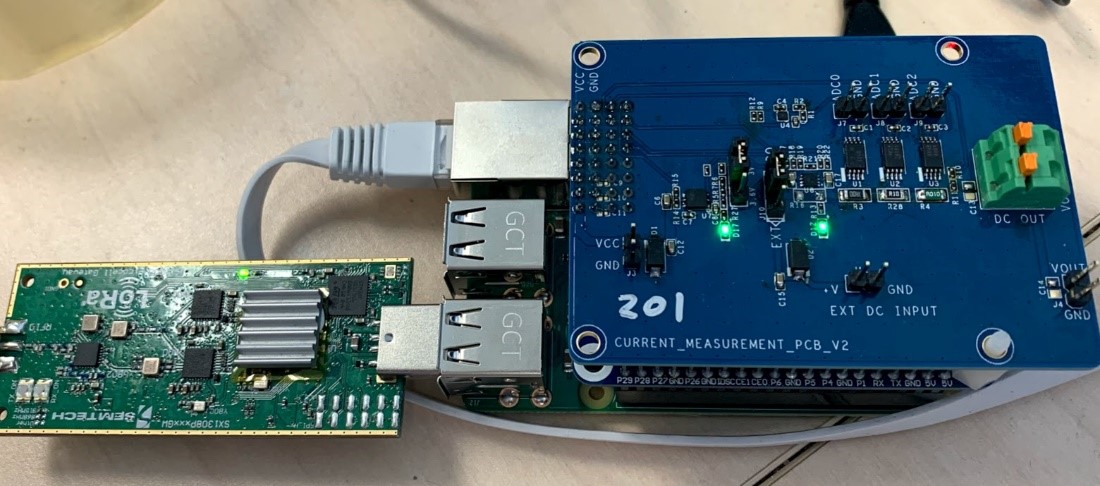
Figure 3: Top view of fully-assembled hardware
Suggestions:
- To make the setup physically stable, use push-ups of the proper height between the three boards
- Use a power supply capable of greater than 2A. We recommend the Raspberry Pi SoulBay 5v 3A Micro USB AC adapter
- Apply a heat sink to the chip (SX1301 or SX1308), and to the system-on-chip (SOC) on the host.
Note: Provide proper RF shielding of the Test Bench and the DUT, or make sure no other gateways provide coverage for the same network server. If there is overlap, the Test Bench may not function properly and packets may be lost.