build
Set up the Software
For Raspberry Pi setup, see https://projects.raspberrypi.org/en/projects/raspberry-pi-setting-up.
TIP: You can access the Raspberry Pi either locally, by plugging-in a monitor and a keyboard, or via SSH.
To access the Raspberry Pi via SSH, you will need the host IP address and an advanced network scanner or Zenmap. To obtain the IP address, make sure the Raspberry Pi has an Ethernet connection. Use the network scanner or Zenmap to scan the network address and find the Test Bench host’s IP address. Alternatively, you can connect to the Raspberry Pi locally, and omit the ipconfig command.
Use SSH/SFTP tools to log on to the host. You can use WinSCP or MobaXterm.
The common default username and password from Raspbian are:
Username: pi
Password: raspberry
The operating system installed and tested on the Raspberry Pi was Raspbian Buster Lite. The minimum required version details are as follows:

Figure 4: Minimum Software Requirements
To meet the software requirements for using the Test Bench, take the following steps.
Note: The following setup instructions are for a Linux environment.
From the command line, enter the following commands in order:
sudo raspi-config --expand-rootfs
sudo apt-get update
sudo apt-get upgrade
sudo apt-get install libatlas-base-dev libxslt1-dev screen python3-pip git autoconf libusb-1.0-0-dev python3-gpiozero
sudo apt-get install python3-mpld3 python3-scipy
sudo pip3 install numpy plotly matplotlib flask pycryptodome
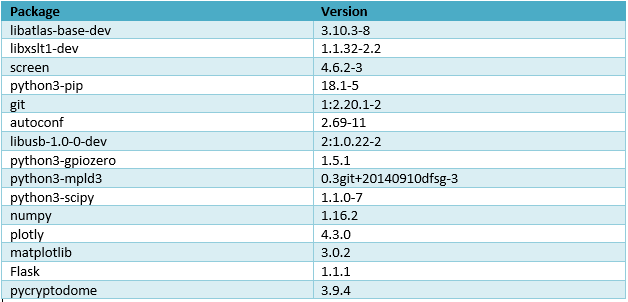
The install commands above will install the following software on your computer. The versions noted are the minimum versions required.
Table 1: Minimum Requirements for a Linux Environment
To install the components necessary for the Pico gateway, enter the following commands:
mkdir /home/pi/lora-net
cd /home/pi/lora-net
git clone https://git.code.sf.net/p/dfu-util/dfu-util
git clone https://github.com/Lora-net/picoGW_packet_forwarder.git
git clone https://github.com/Lora-net/picoGW_mcu.git
git clone https://github.com/Lora-net/picoGW_hal.git
cd /home/pi/lora-net/dfu-util
./autogen.sh
./configure
make
sudo make install
cd /home/pi/lora-net/picoGW_hal
make clean all
cd /home/pi/lora-net/picoGW_packet_forwarder
make clean all
Following is an example of the global_conf.json packet forwarder, applicable to the US915 band. This example uses a Semtech USB PicoCell gateway connected to the Raspberry Pi. For the purposes of the Test Bench, the gateway_ID field must be configured, as shown in the following example.
Note: If you want to use the Test Bench for the EU868 band, you will need to use a global_conf.json file specific to that band. In the example below fields to be edited have been highlighted.
Global_conf.json example :
|
{ "SX1301_conf": { "lorawan_public": true, "clksrc": 1, "antenna_gain": 0, "radio_0": { "enable": true, "type": "SX1257", "freq": 902700000, "rssi_offset": -164.0, "tx_enable": true, "tx_freq_min": 902000000, "tx_freq_max": 928000000 }, "radio_1": { "enable": true,
"type": "SX1257", "freq": 903400000, "rssi_offset": -164.0, "tx_enable": false }, "chan_multiSF_0": { "enable": true, "radio": 0, "if": -400000 }, "chan_multiSF_1": { "enable": true, "radio": 0, "if": -200000 }, "chan_multiSF_2": { "enable": true, "radio": 0, "if": 0 }, "chan_multiSF_3": { "enable": true, "radio": 0, "if": 200000 }, "chan_multiSF_4": { "enable": true, "radio": 1, "if": -300000 }, "chan_multiSF_5": { "enable": true, "radio": 1, "if": -100000 }, "chan_multiSF_6": { "enable": true, "radio": 1, "if": 100000 }, "chan_multiSF_7": { "enable": true, "radio": 1, "if": 300000 }, "chan_Lora_std": { "enable": true, "radio": 0, "if": 300000, "bandwidth": 500000, "spread_factor": 8 }, "chan_FSK": { "enable": false, "radio": 0, "if": 300000, "bandwidth": 250000, "datarate": 100000 }, "tx_lut_0": { "pa_gain": 0, "mix_gain": 5, "rf_power": 9, "dig_gain": 3 }, "tx_lut_1": { "pa_gain": 0, "mix_gain": 5, "rf_power": 9, "dig_gain": 3 }, "tx_lut_2": { "pa_gain": 0, "mix_gain": 5, "rf_power": 9, "dig_gain": 3 }, "tx_lut_3": { "pa_gain": 0, "mix_gain": 5, "rf_power": 9, "dig_gain": 3 }, "tx_lut_4": { "pa_gain": 0, "mix_gain": 5, "rf_power": 9, "dig_gain": 3 }, "tx_lut_5": { "pa_gain": 0, "mix_gain": 5, "rf_power": 9, "dig_gain": 3 }, "tx_lut_6": { "pa_gain": 0, "mix_gain": 6, "rf_power": 11, "dig_gain": 3 }, "tx_lut_7": { "pa_gain": 0, "mix_gain": 5, "rf_power": 13, "dig_gain": 2 }, "tx_lut_8": { "pa_gain": 0, "mix_gain": 8, "rf_power": 14, "dig_gain": 3 }, "tx_lut_9": { "pa_gain": 0, "mix_gain": 10, "rf_power": 15, "dig_gain": 2 }, "tx_lut_10": { "pa_gain": 0, "mix_gain": 6, "rf_power": 16, "dig_gain": 1 }, "tx_lut_11": { "pa_gain": 0, "mix_gain": 9, "rf_power": 17, "dig_gain": 3 }, "tx_lut_12": { "pa_gain": 0, "mix_gain": 10, "rf_power": 18, "dig_gain": 3 }, "tx_lut_13": { "pa_gain": 0, "mix_gain": 11, "rf_power": 19, "dig_gain": 3 }, "tx_lut_14": { "pa_gain": 0, "mix_gain": 12, "rf_power": 20, "dig_gain": 3 }, "tx_lut_15": { "pa_gain": 0, "mix_gain": 13, "rf_power": 27, "dig_gain": 2 } }, "gateway_conf": { "gateway_ID": "0000000000000000", //Put here the GW ID you want to use. "server_address": "localhost", "serv_port_up": 1690, "serv_port_down": 1690, "keepalive_interval": 10, "stat_interval": 30, "push_timeout_ms": 500, "forward_crc_valid": true, "forward_crc_error": false, "forward_crc_disabled": false } } |