documentation
Adding Your Kit to LoRa Cloud™ Services
There are a few steps involved in getting your trackers online for the first time. The process of setting up the devices is illustrative of the overall set-up and system configuration process. By following the steps outlined below, you should be up and running quickly. Large-scale deployments can be automated by bulk import utilities and APIs.
Create a LoRa Cloud™ Services Portal Account
Before an LR1110 based device can be claimed, you first must have an account on the LoRa Cloud™ Services portal. Follow these instructions to set up your account.
- Open the LoRa Cloud Portal.
- Click LOGIN.
- At the bottom of the Welcome window, click Sign up, and then enter your email address and create a password.
- You should receive a confirmation email for the account. Click on the confirmation link in the email. Your browser should open and take you to the login page.
- After logging into your new account, you will need to accept the Terms & Conditions of Use. Once you accept these, your account activation will be complete.
Claim Your Devices on the LoRa Cloud Join Server
Create an Application Owner
Before you can claim your devices, you will need to create an Application Owner. An Application Owner is used to organize a group of devices. Create an Application Owner following these steps:
- Log into the LoRa Cloud Portal.
- The landing page displays. Select the Join Server tile.
- Click APPLICATION OWNERS in the menu on the left.
- Enter Asset Management EVK, or a name of your choosing, in the Application Owner Name input field.
- Click CREATE NEW OWNER.
- Your new application owner appears in the list of application owners.
Associate Your Application Owner with the ThingPark Network Server
This section shows you how to configure the Application Owner to accept join requests from the ThingPark Network Server.
- Log into the LoRa Cloud Portal.
- The landing page displays. Select the Join Server tile.
- Click APPLICATION OWNER BINDINGS.
- Select the option labelled Accept join requests only from the list of Network Servers specified below.
- Click on the Select Network Server dropdown and select the option rens-101 - Actility ThingPark Wireless DEV1.
- Click ASSOCIATE.
- Click SAVE BINDINGS.
- The ThingPark Network Server is now bound to your Application Owner and join requests from the ThingPark Network Server will be accepted.
Note
Currently the “Owner Context” for these devices is not defined.
On-boarding: Network-Server Specific
For the LoRa Cloud join server to handle joining a device to the network, the device's Application Owner must be associated with the network servers that will route the traffic to it and from it. By default, no network servers are enabled for use by your Application Owners.
You may set up devices that will interact with more than one LoRaWAN® network server. The following diagram shows two configuration setup examples. In the top example, a block of devices will be configured for LoRaWAN Network Server 1 (Server 1). The join requests for devices received from that network server for a claimed device will use the application configuration logic for appo-::a in the system. This is modified using the join server Application Owner API.
The second configuration example shows how the LoRa Cloud join server can support integrations with multiple network servers.
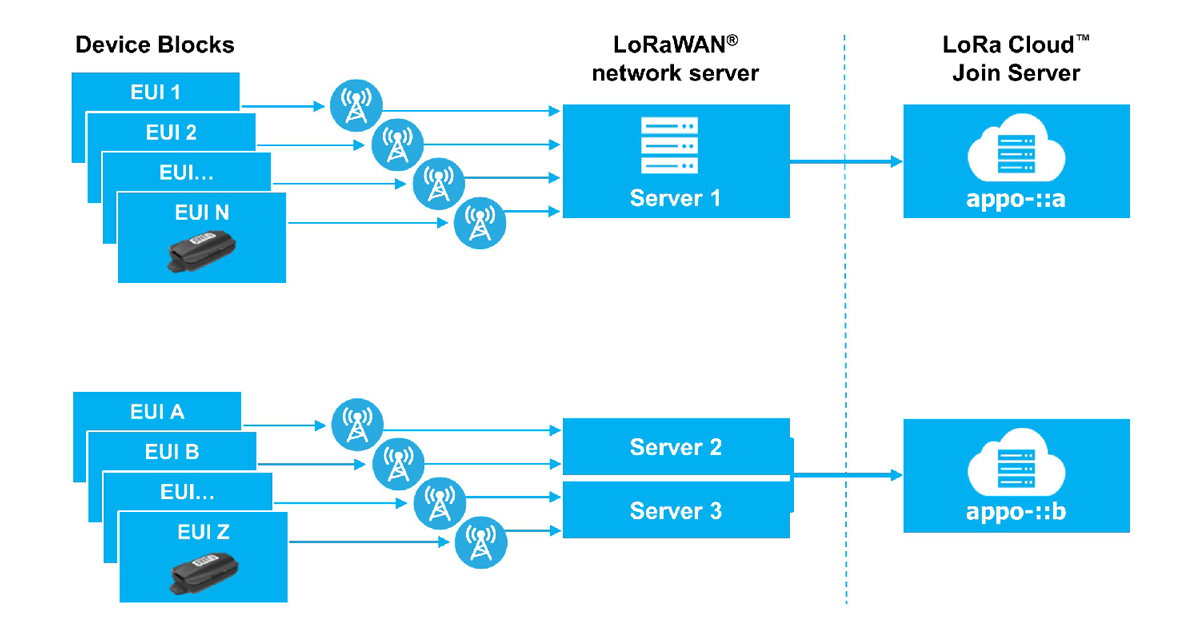
Relationship between LoRaWAN network servers and applications in LoRa Cloud Applications IDs.
Mapping a network server to a specific Application Owner allows specific parameters to be set up for handling data when operating with each network server. There are three common settings for each application definition:
- name
- wrapkey
- nslist
The name is an arbitrary string to represent the application. The wrapkey is a specific token used for encrypting the AppSKey, used during the transport of the AppSKey from the join server to the application server by the network server. The nslist is a list of LoRaWAN network servers that will be associated with this Application Owner configuration.
Each LoRaWAN session derives a unique AppSKey that is used for encrypting the LoRaWAN payload data between the device and the application server. The wrapkey can be null, indicating that the AppSKey will be passed from the join server to the application server by the network server unencrypted. For more information on working with the AppSKey, please see the Transport of AppSKey documentation here.
Once the network servers are configured for a particular Application Owner via the LoRa Cloud join server, the device join process can be performed. The LoRaWAN network server that sees the join request from the claimed device will forward this on to the LoRa Cloud join server. It will provide the session keys and return them, along with the join response, to the network server.
If a wrapkey is defined for the application associated with the network server, the AppSKey is returned encrypted. Otherwise, the AppSKey will be returned in plain text by the join server. The LoRaWAN network server will send the join response to the device. Once a data message is sent (following the join response) to the LoRaWAN network server, the join process will be complete and the device will be configured for operation on that network server.
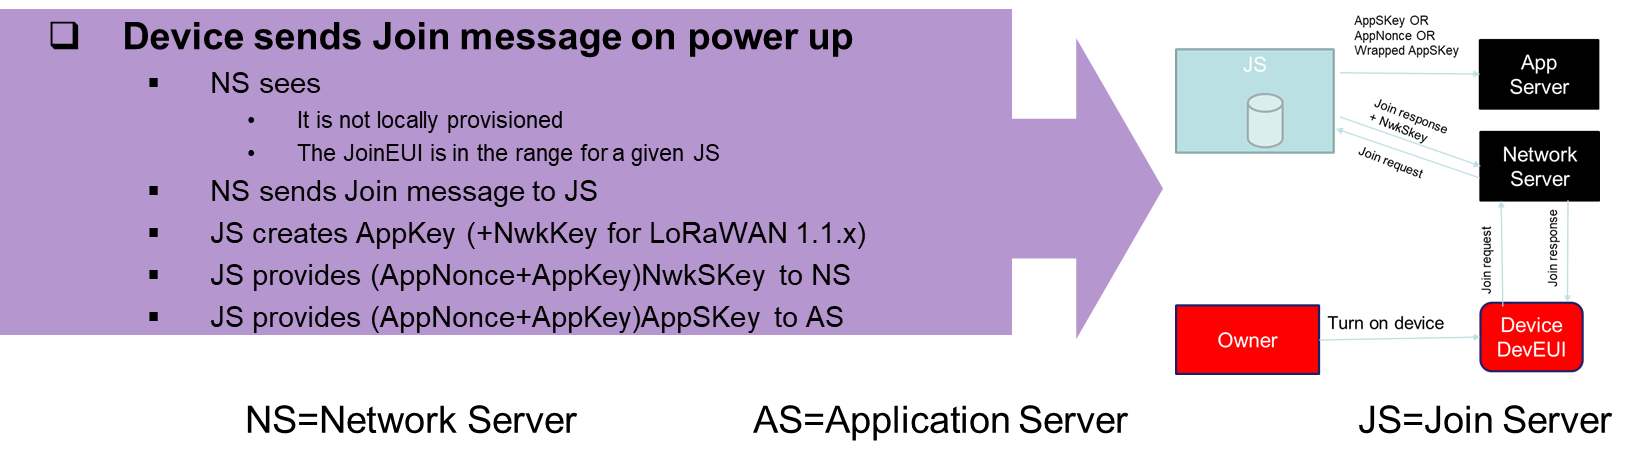
Join Flow
Claim Your Devices
In your Kit, you will find the DevEUI, AppEUI (JoinEUI), and PIN for each LR1110 based device. The DevEUI is emailed to you when the Kit is purchased. Use these to complete this section. The DevEUI, AppEUI (JoinEUI) and PIN can also be extracted via the BLE application that is described in Setting-up and Operating the LR1110 Based Devices
Repeat the following steps for each LR1110 based device in your kit:
- Log into the LoRa Cloud™ Portal.
- The landing page displays. Select the Join Server tile.
- Click DEVICES in the menu on the left.
- The Devices page displays, with your application owner selected. Click CLAIM INDIVIDUAL DEVICE.
- Complete the Claim Device form as follows:
- CHIP EUI: Enter the DevEUI supplied in your kit. This is also sent to you via email when you purchase the kit.
- PIN: Enter the PIN supplied in your kit. If there is a letter O at the start of the supplied PIN, do not include this when entering this field.
- DEVICE EUI: Check the Same as Chip EUI box.
- Leave the remaining fields empty.
- Click the CLAIM DEVICE button to add the device.
- The Device Claimed screen displays, showing the confirmation message.
- Click BACK TO DEVICES.
- Your device is now claimed on the join server and listed on the Devices page.
Set up LoRa Cloud™ Modem & Geolocation Services
In this section you learn how to create a Device Owner in order to use LoRa Cloud Modem & Geolocation Services for your LR1110-based devices. You then learn how to fetch a token that will be added to the transmission of the data between Modem & Geolocation Services and your application server.
Create a Device Owner
- Log into the LoRa Cloud™ Portal.
- The landing page displays. Click on the Modem & Geolocation Services tile.
- Click DEVICE OWNERS in the menu on the left.
- Click CREATE NEW OWNER.
- Complete the Add a Device Owner form:
- NAME: Pick a memorable name (spaces are not allowed).
- Click SUBMIT.
- Your new Device Owner is now listed on the Manage Device Owners page.
Create a Modem & Geolocation Services API Access Token
When you created a Device Owner, two API access tokens with full rights were generated automatically. You can use these by skipping to the next section Fetch a Modem & Geolocation Services API Access Token, or you can follow the instructions below to create additional tokens.
- Log into the LoRa Cloud Portal.
- The landing page displays. Click on the Modem & Geolocation Services tile.
- Click MANAGE TOKENS in the menu on the left.
- From the Manage Tokens page, select CREATE NEW TOKEN.
- On the Add New Token page, name the token and select its Permissions. At a minimum, select the following permissions:
- LIST/READ DEVICE STATE
- DELIVER UPLINKS
- ADD/DELETE DEVICES
- ISSUE DEVICE REQUESTS
- ADD/DELETE TOKENS
- Click CREATE NEW TOKEN.
- The token appears on the page.
Note
When you add a token, you select its permissions. Once set, the permissions of the token cannot be changed. However, a token can be renamed or deleted at any time. You will use a defined token to access the various commands available in the Modem & Geolocation Services API to add new devices and list current devices. You can even list and add new tokens if the token you use has sufficient permissions. One of the most important uses of the token will be to transmit and receive data to and from the Modem & Geolocation Services. This token will be needed to provision the device on the TagoIO account interface.
Fetch a Modem & Geolocation Services API Access Token
- Log into the LoRa Cloud Portal.
- The landing page displays. Click on the Modem & Geolocation Services tile.
- Click MANAGE TOKENS in the menu on the left.
- You can view any token value by clicking View next to the token.
- Copy the token value to the clipboard by clicking Copy. The copied token is included in external applications that interface with the Modem & Geolocation Services. Save the token somewhere safe you can access it later, we refer to this token later as
MGS_TOKEN.
Add Your LR1110 Based Devices to Modem & Geolocation Services
To add a device to Modem & Geolocation Services, follow these steps:
- Log into the LoRa Cloud Portal.
- The landing page displays. Click on the Modem & Geolocation Services tile.
- Click MANAGE DEVICES in the menu on the left.
- On the Manage Devices page, click ADD DEVICES.
- Complete the Add Devices form:
-
EUI(S): Enter the two DevEUIs supplied in your kit, separated by a comma (,)
E.g., For the two DevEUIs 151ee24b54081324 and 92506d25a2766d54, you would enter:
151ee24b54081324, 92506d25a2766d54
-
- Click ADD DEVICES.
- The devices appear in the Manage Devices list.
Note
You can also manage devices through the Modem & Geolocation Services API.