documentation
Setting-up and Operating the LR1110 Based Devices
Semtech’s LoRa Edge™ Tracker Reference Design is shipped in airplane mode in order to not transmit while in transport. This section provides instructions for setting-up the device, pairing it with its initialization phone application, and connecting to the services it supports.
Create a QR Code for the LoRa Cloud™ Modem & Geolocation Services Token
- Log into the LoRa Cloud™ Portal.
- The landing page displays. Click on the Modem & Geolocation Services tile.
- Click MANAGE TOKENS in the menu on the left.
- Choose a token and click the Copy button next to it.
- Open a QR generator tool of your choosing and generate a QR code using the token. If you do not have any you already use, you can follow these instructions:
- Open QR Code Generator.
- Choose the TEXT option.
- Paste the token you just copied into the Enter your text field.
- The QR code appears.
- Leave this page open, or click the DOWNLOAD button to save the QR Code as a JPG. You need this code in the next stage.
Install and configure the LoRa Edge™ Config application
The first step in setting up your devices is to install and configure the Bluetooth smartphone application that enables the initial configuration of the LR1110 based device. Follow the instructions for your smartphone.
Option 1: Configure the iOS application
- Open the iOS App Store, search for LoRa Edge™ Config, and install the application.
- Open the LoRa Edge Config application on your iOS smartphone.
- Accept the license agreement which appears.
- Tap OK in the Permission to use Bluetooth dialog box that displays.
- Tap Later when asked if you wish to change the default Almanac URL.
- Tap the Settings tab in the bottom menu bar.
- Locate the settings section titled LoRa Cloud, and tap on the Authentication token field.
- Grant permission for the app to access the camera.
- Point the camera to the QR code you just generated. The camera app will close. The Almanac will be fetched automatically.
- Locate the settings section titled Inspector. Tap on the Inspector mode field.
- Tap on the Advanced mode switch, and tap OK to enable Advanced Mode.
Option 2: Configure the Android application
- Open the Google Play Store app, search for LoRa Edge™ Config, and install the application.
- At the Almanac url dialog box, select LATER.
- Tap the menu button (
 ).
). - Tap Settings.
- The Settings page opens. Locate the section titled LoRa Cloud and tap on the Authentication token field.
- Grant permission for the app to access the camera.
- Point the camera to the QR code you just generated. The camera app will close. The Almanac will be fetched automatically.
- Locate the settings section titled Inspector. Tap on the Inspector mode field.
- Tap on the Advanced Mode option.
Configure Your Trackers
Repeat the following steps for each tracker.
Connect the Application to Your LR1110 Based Device
Follow the instructions for your smartphone.
Option 1: Connect using iOS
- Tap on the Trackers tab in the bottom menu of the LoRa Edge Config application.
-
Put your device in BLE pairing mode by placing the provided magnet (with the notch-side down) against the oval hole on the device, and then place the flat side of the magnet directly against the device. This should cause the red LED to start blinking.
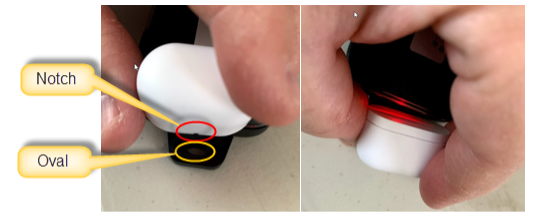
Placing the LR1110 based device into BLE mode
Note
Whilst the red LED is blinking, the device is in BLE pairing mode. The device stays in BLE pairing mode for 30 seconds before leaving this state. If you are unable to connect within this time period, you can repeat this step so the device enters pairing mode again.
- Tap the Scan button on the smartphone application.
- Your LR1110 based device appears on the Scanner page.
- Tap on the device name in the list. The application will connect to the tracker.
Note
There is a connection timeout of two minutes. This timeout is refreshed after each action a user initiates in the smartphone app.
You are now on the Settings page for your device. If one of the next actions takes longer than expected, reconnect the LoRa Edge Config application to your device by repeating the steps in this section. If the device is not listed on the Scanner page, quit the LoRa Edge Config application and restart it.
Continue to the section Configure Your LR1110 Based Device
Option 1: Connect using Android
- Tap the start scan button (
 ) in the bottom right corner of the screen.
 - Grant the application permission to access your device location.
- The Scanner screen displays.
- Put your LR1110 based device in BLE pairing mode by placing the provided magnet (with the notch-side down) against the oval hole on the device, and then place the flat side of the magnet directly against the device. This should cause the red LED to start blinking.
Placing the LR1110 based device into BLE mode
Note
Whilst the red LED is blinking, the LR1110 based device is in BLE pairing mode. The device stays in BLE pairing mode for 30 seconds before leaving this state. If you are unable to connect within this time period, you can repeat this step so the device enters pairing mode again.
- Your LR1110 based device appears on the Scanner page.
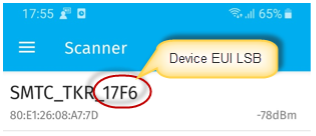
LoRa Edge Config application showing a detected LR1110 based device
- Tap on the name of the device that displays on the Scanner page. The application will connect to the tracker.
Note
There is a connection timeout of two minutes. This timeout is refreshed after each action a user initiates in the smartphone app.
The Settings page for your device is now displayed. If one of the next actions takes longer than expected, reconnect the LoRa Edge Config application to your device by repeating the steps in this section. If the device is not listed on the Scanner page, quit the LoRa Edge Config application and restart it.
Configure Your LR1110 Based Device
Ensure the application has connected to your device within in the last two minutes, and that you are on the Settings page for your device by following the steps in the Connect the Application to Your LR1110 Based Device section.
- Locate the section titled Versions and FUOTA. Complete the following steps:
- Update your application firmware (if a new version is available) by tapping on Update application firmware and tapping Update. This process takes about one minute.
- Update the LoRa Basics™ Modem-E modem firmware (if a new version is available) by tapping on Update LoRa Basics™ modem-E firmware and tapping Update. This process takes about one minute.
- Locate the section titled GNSS. Complete the following steps:
- Switch GNSS scan to enabled.
- Tap on the Update almanac field. This process takes approximately 30 seconds.
- Tap on the GNSS assistance position field. In the fields displayed, enter the Latitude for the physical location of the device you are configuring into the top (iOS) or left (Android) field, and the Longitude into the bottom (iOS) or right (Android) field. Your Latitude and Longitude coordinates can be found via Google Maps, or via this on-line tool.
- Tap OK. The syncing process should take a few seconds. See the LR1110 documentation for a full explanation of assisted GNSS.
- Locate the section titled LoRaWAN®. Verify that the Semtech join server mode is set to Enabled.
- Locate the section titled Miscellaneous. Tap the switch (iOS) or checkbox (Android) next to the Airplane mode field to change Airplane mode to Disabled. The syncing process should take a second.
- Hold the magnet to the device, as you did previously. This will cause the device to reset. The red light begins flashing and since the device is no longer in airplane mode, the join process will begin. Wait for around 5 minutes to allow enough time for the process to complete.
Verify the Device Joined and Configuration is Working
Check to make sure that the device has successfully joined the network using the join server by following these steps:
- Open the LoRa Cloud™ Portal and select the Join Server tile.
- Click DEVICES in the menu on the left.
- The device you have just reset will have a timestamp in the Last Join column.
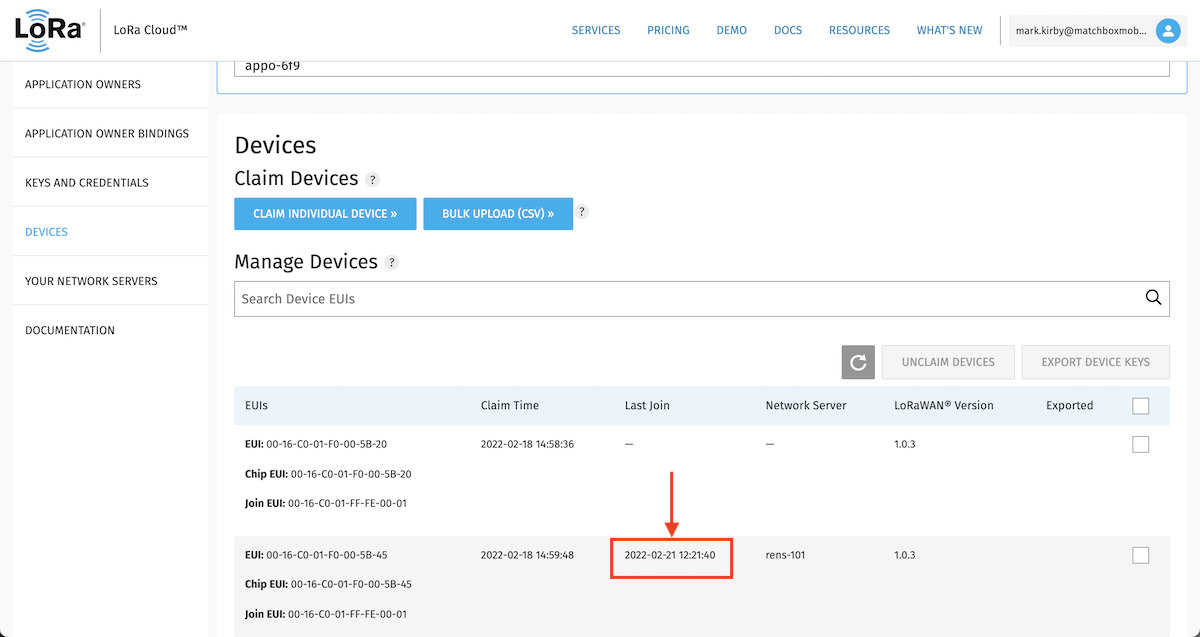
The timestamp in the Last Join column indicating this device is joined
Note
If there is no timestamp in the Last Join column, wait a few more minutes and then refresh the display. If the device still does not join, try the steps in the FAQ: My device is able to communicate with the LoRa Edge™ Config app, but is not joining the network.
Verify that device messages are being received by the network server by following these steps:
- Open the ThingPark Community Portal.
- At the main menu, under Devices, select List.
- The device you joined should have a timestamp in the Last Uplink column.
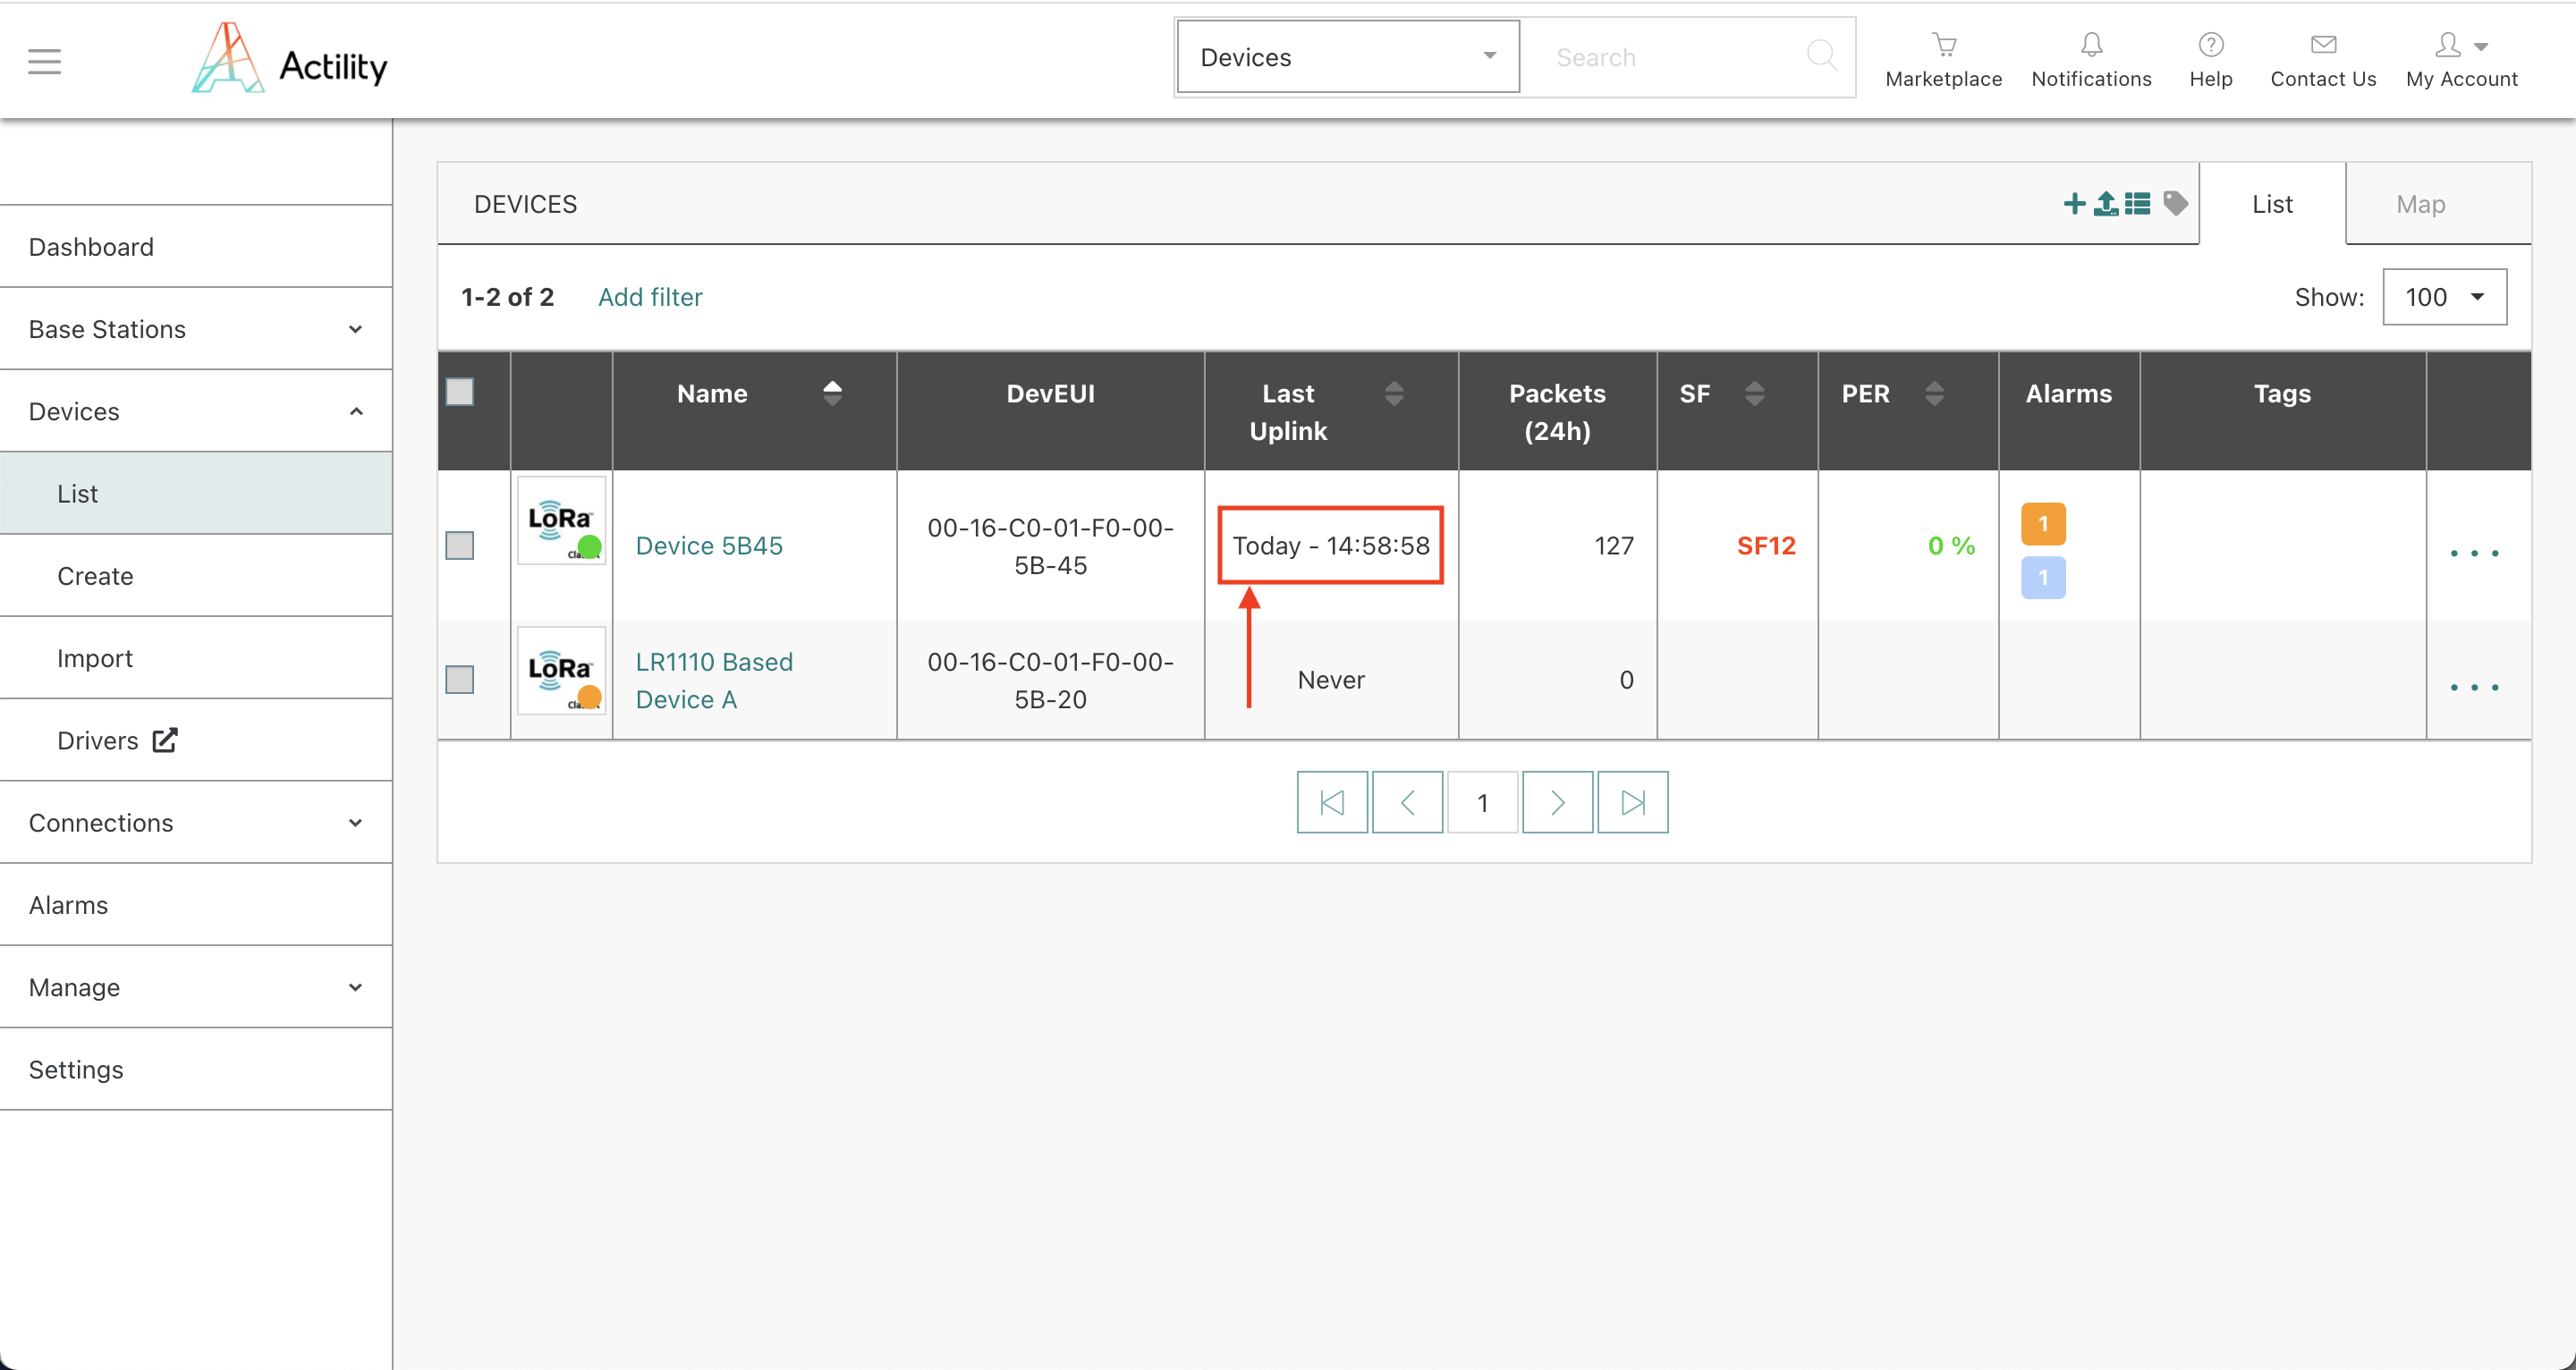
The timestamp in the Last Uplink column indicating the network server is receiving device messages
Note
If you do not see the timestamp, try the steps in the FAQ: Why is the Tracker not working? I am not seeing any updates or data on the map in the TagoIO dashboard.
Verify that messages are being sent from the network server to TagoIO by following these steps:
- Go outside with the LR1110 based device, somewhere with clear line-of-sight to the sky.
- Wait a few minutes, to allow the device to get a GNSS location and send a message.
- Open TagoIO and log in to your TagoIO account.
- Select the dashboard for the device you created from the menu on the left.
-
The TX UTC TIME widget should display a timestamp. This indicates the connection between ThingPark and TagoIO is working.
If the device has managed to get a location, you will also see a location indicated on the map widget.
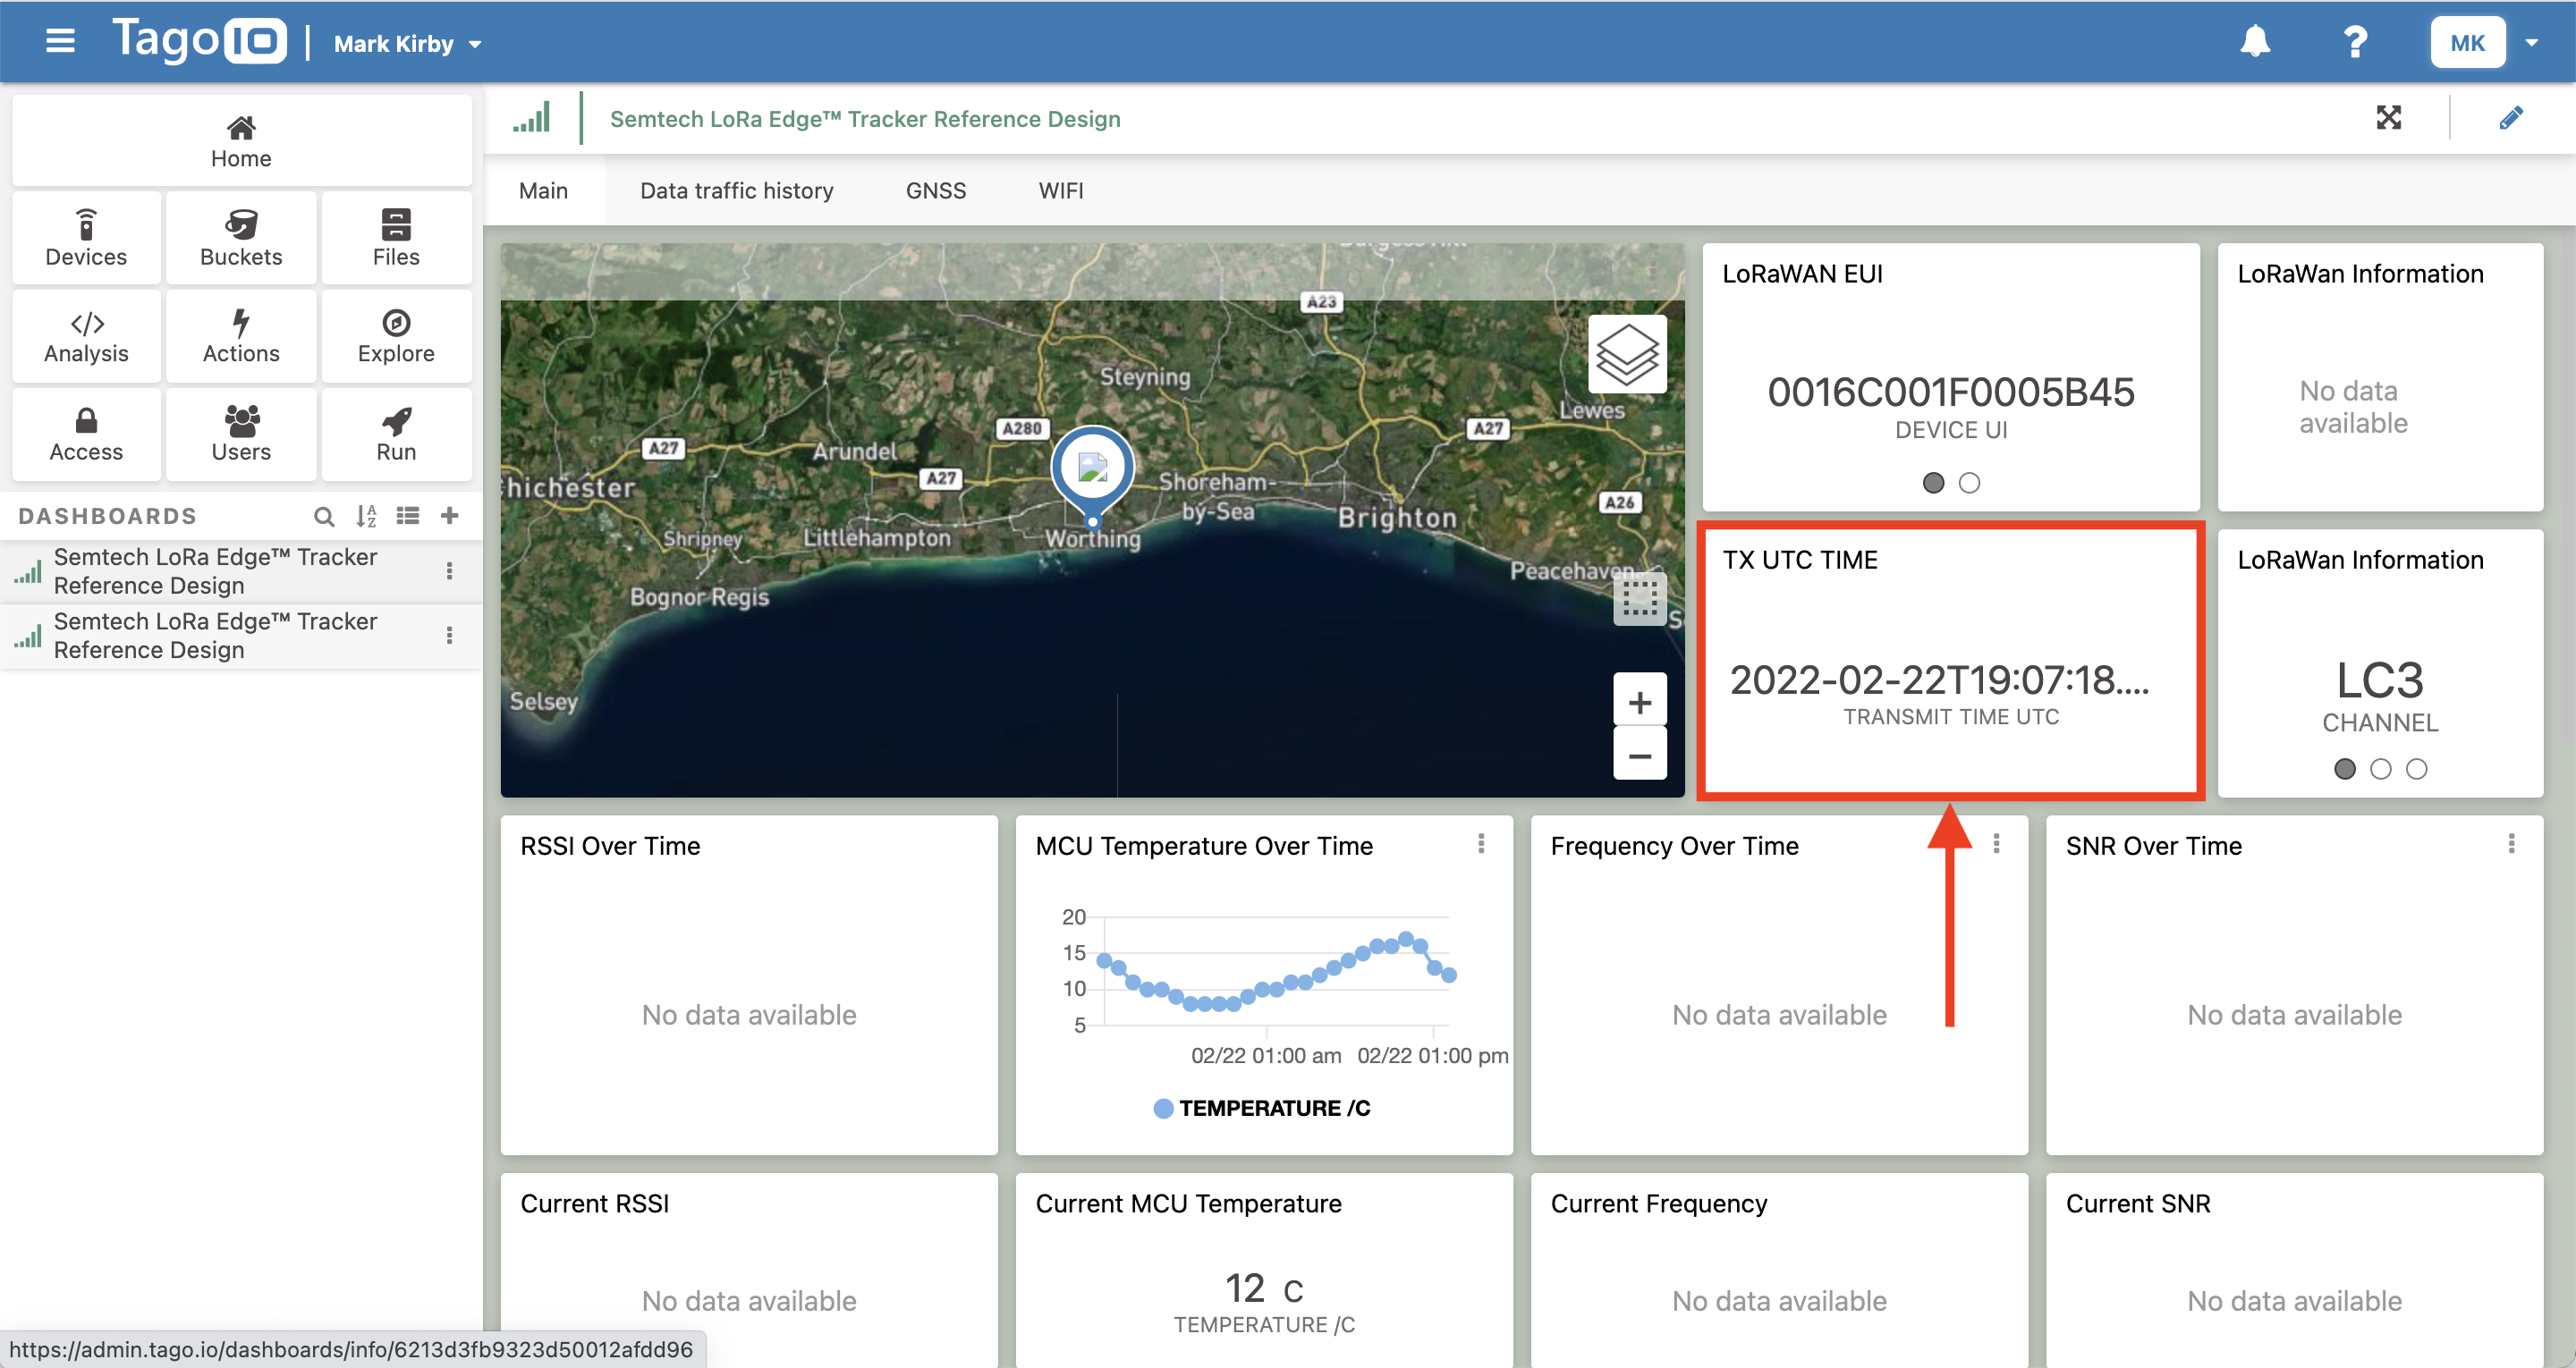
The timestamp in the TX UTC TIME column indicating the TagoIO application is receiving device messages
Note
If you do not see the timestamp, try the steps in the FAQ: Why is the Tracker not working? I am not seeing any updates or data on the map in the TagoIO dashboard.
Mobile Application Features and Functions
The mobile application, LoRa Edge™ Config, has a number of features and functions. It can update both the LoRa Edge Tracker application firmware on the device and the modem firmware. If there are updates for either, LoRa Edge Config will indicate that updates are available in the Versions and FUOTA section of the Settings page.
To familiarize yourself with LoRa Edge Config and the embedded device operations, see the LoRa Edge Config documentation in the LoRa Edge Tracker Reference User Guide.
Retrieving the DevEUI, JoinEUI, and PIN
If you ever lose the paper containing the DevEUI, JoinEUI and PIN that came with your Kit, you can retrieve these using LoRa Edge Config by following these steps.
- Open the LoRa Edge Config smartphone application, scan and connect to your LR1110 based device by following the instructions in the Connect the Application to Your LR1110 Based Device section above.
- Navigate to the LoRaWAN® section of the Settings screen.
- Retrive the keys as follows:
- The DevEUI is in the LoRaWAN device EUI field.
- The JoinEUI is in the LoRaWAN join EUI field.
- The PIN is in the LR1110 PIN code field.

DevEUI, JoinEUI, and PIN code displayed in the LoRa Edge Config application