documentation
LoRa Edge Tracker Ref Design - User Guide documentation (v2)
Mobile Application: LoRa Edge™ Config
LoRa Edge™ Config is a mobile application developed to accompany the LoRa Edge Tracker Reference Design. The purpose of this app is to help users configure and update their Trackers.
Note
Only V2.X.X version of the app supports the LoRa Basics™ Modem version of the LoRa Edge™ Tracker Reference Design.
To install LoRa Edge Config™ on your mobile device, see Quick Start.
Start Screen
The key elements on this screen are the Settings menu icon and the Scan icon, as shown in Figure 39 and Figure 40.
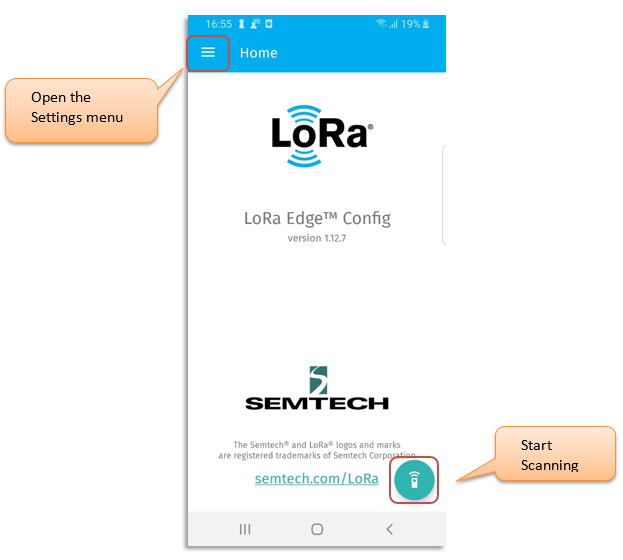
Figure 39: LoRa Edge Config Starting-Screen – Android*
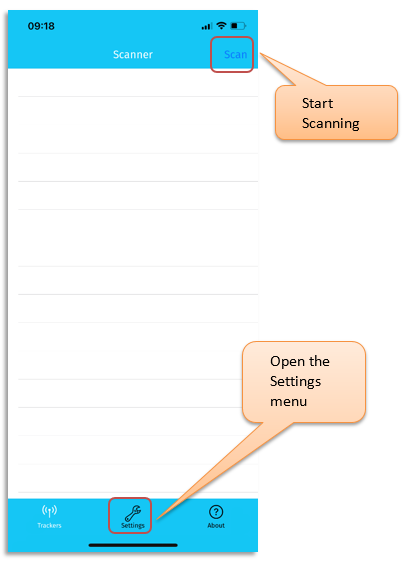
Figure 40: LoRa Edge Config Starting-Screen – iOS*
Settings Screen
On the Settings screen, you can configure the following items.
Device filter: Select the types of devices, that are in BLE advertising mode, to display when conducting a BLE scan :
Show all devices.
Show only Semtech LoRa Edge Tracker Reference Designs.
Show only devices with custom name prefixes.
Inspector mode:
Advanced mode displays all parameters on the Parameters screen.
Basic mode displays only profile data on the Parameters screen.
Share latest internal log file: Sends the latest internal log file (for example, via email).
Share latest diagnosis file: Sends the latest diagnosis file (for example, via email).
Authentication Token: The authentication token generated by the LoRa Cloud™ Device Join service. Clicking on the token opens the camera application on your mobile device and allows you to scan the QR code containing the authentication token generated by the LoRa Cloud Device Join service.
Almanac Cloud URL: URL used by the app to fetch the almanac.
Almanac: Version of the locally-installed almanac.
Modem-E Tracker Firmware manifest URL: URL of the firmware manifest for LoRa Edge Config Modem-E Tracker application and LR1110 Modem-E firmware.
LoRa Basics™ Modem Tracker Firmware manifest URL: URL of the firmware manifest for LoRa Edge Config LoRa Basics Modem Tracker application and LR1110 transceiver firmware.
LoRa Basics™ Modem-E firmware: Firmware version currently installed on the LoRa Basics Modem-E.
LoRa Basics™ Modem-E Tracker app firmware: Firmware version currently installed on the LoRa Edge Tracker Reference Design.
LR1110 transceiver firmware: Firmware version currently installed on the LR1110.
LoRa Basics™ Modem Tracker app firmware: Firmware version currently installed on the LoRa Basics™ Modem version of the LoRa Edge Tracker Reference Design.
Get firmware from USB storage (Android Only): When checked, fetches the active firmware update from the USB storage location.
Need help ?: When tapped, sends this user guide to the mobile device.
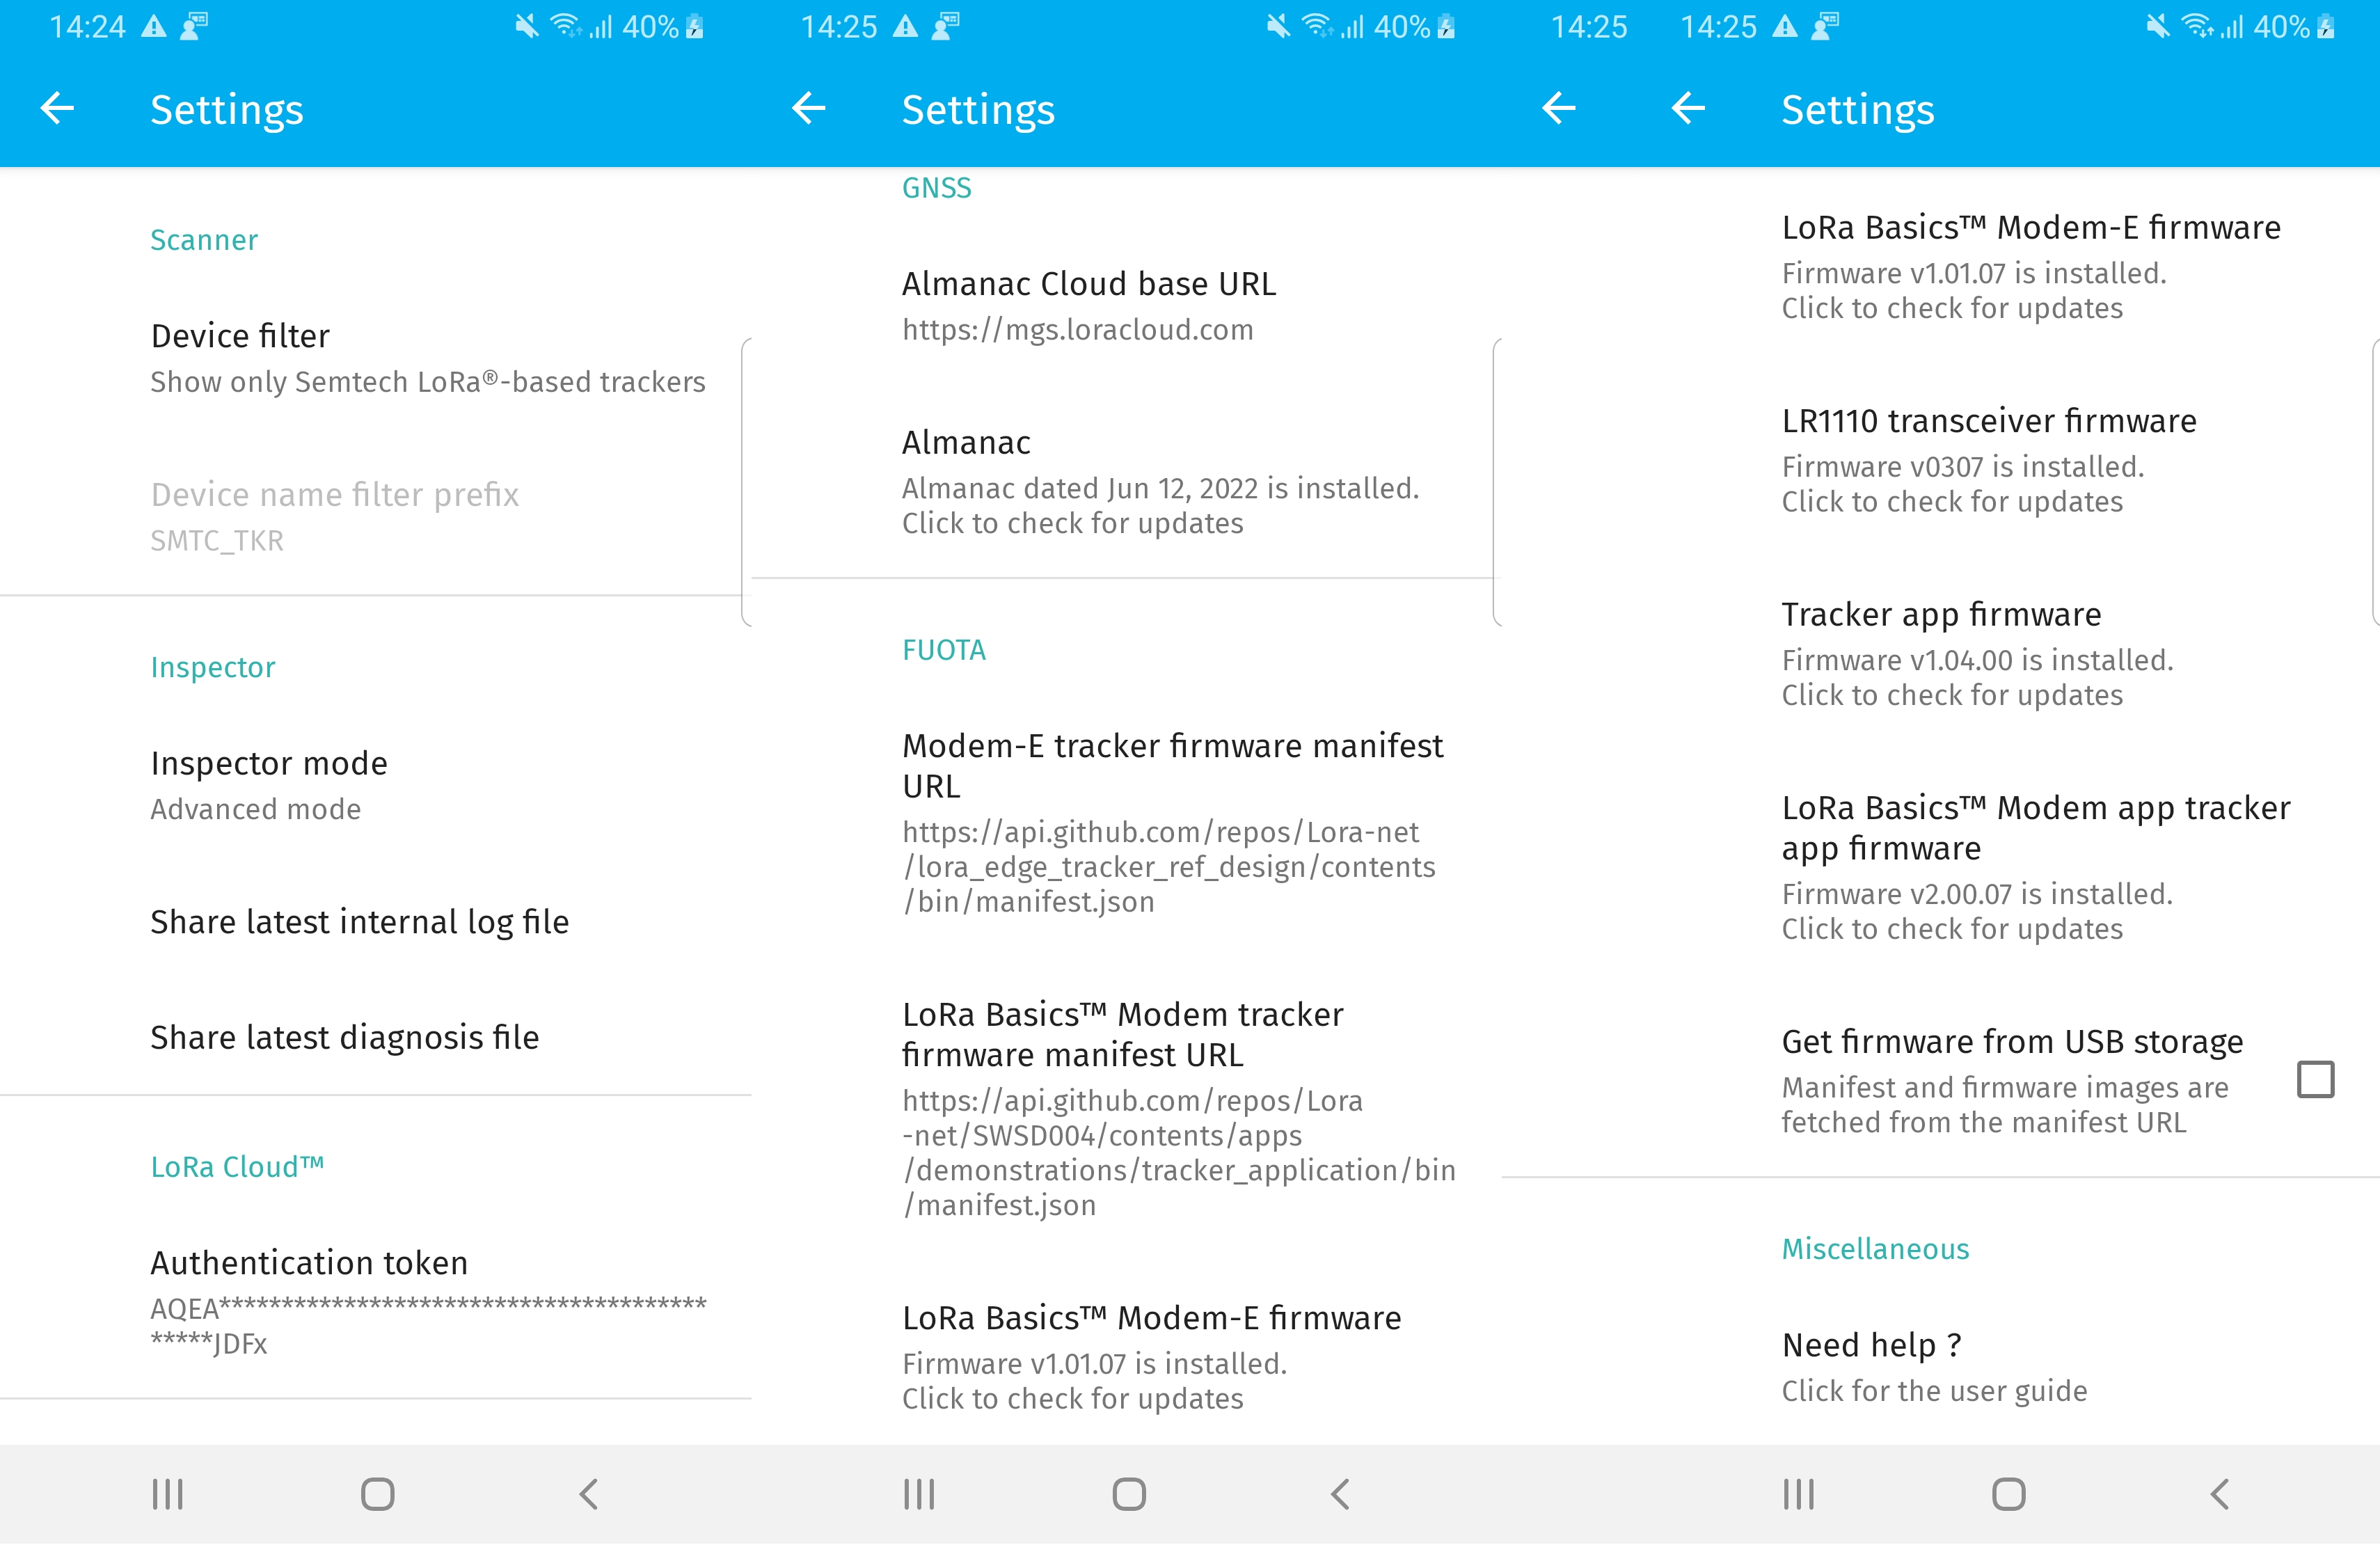
Figure 41: Settings - Android*
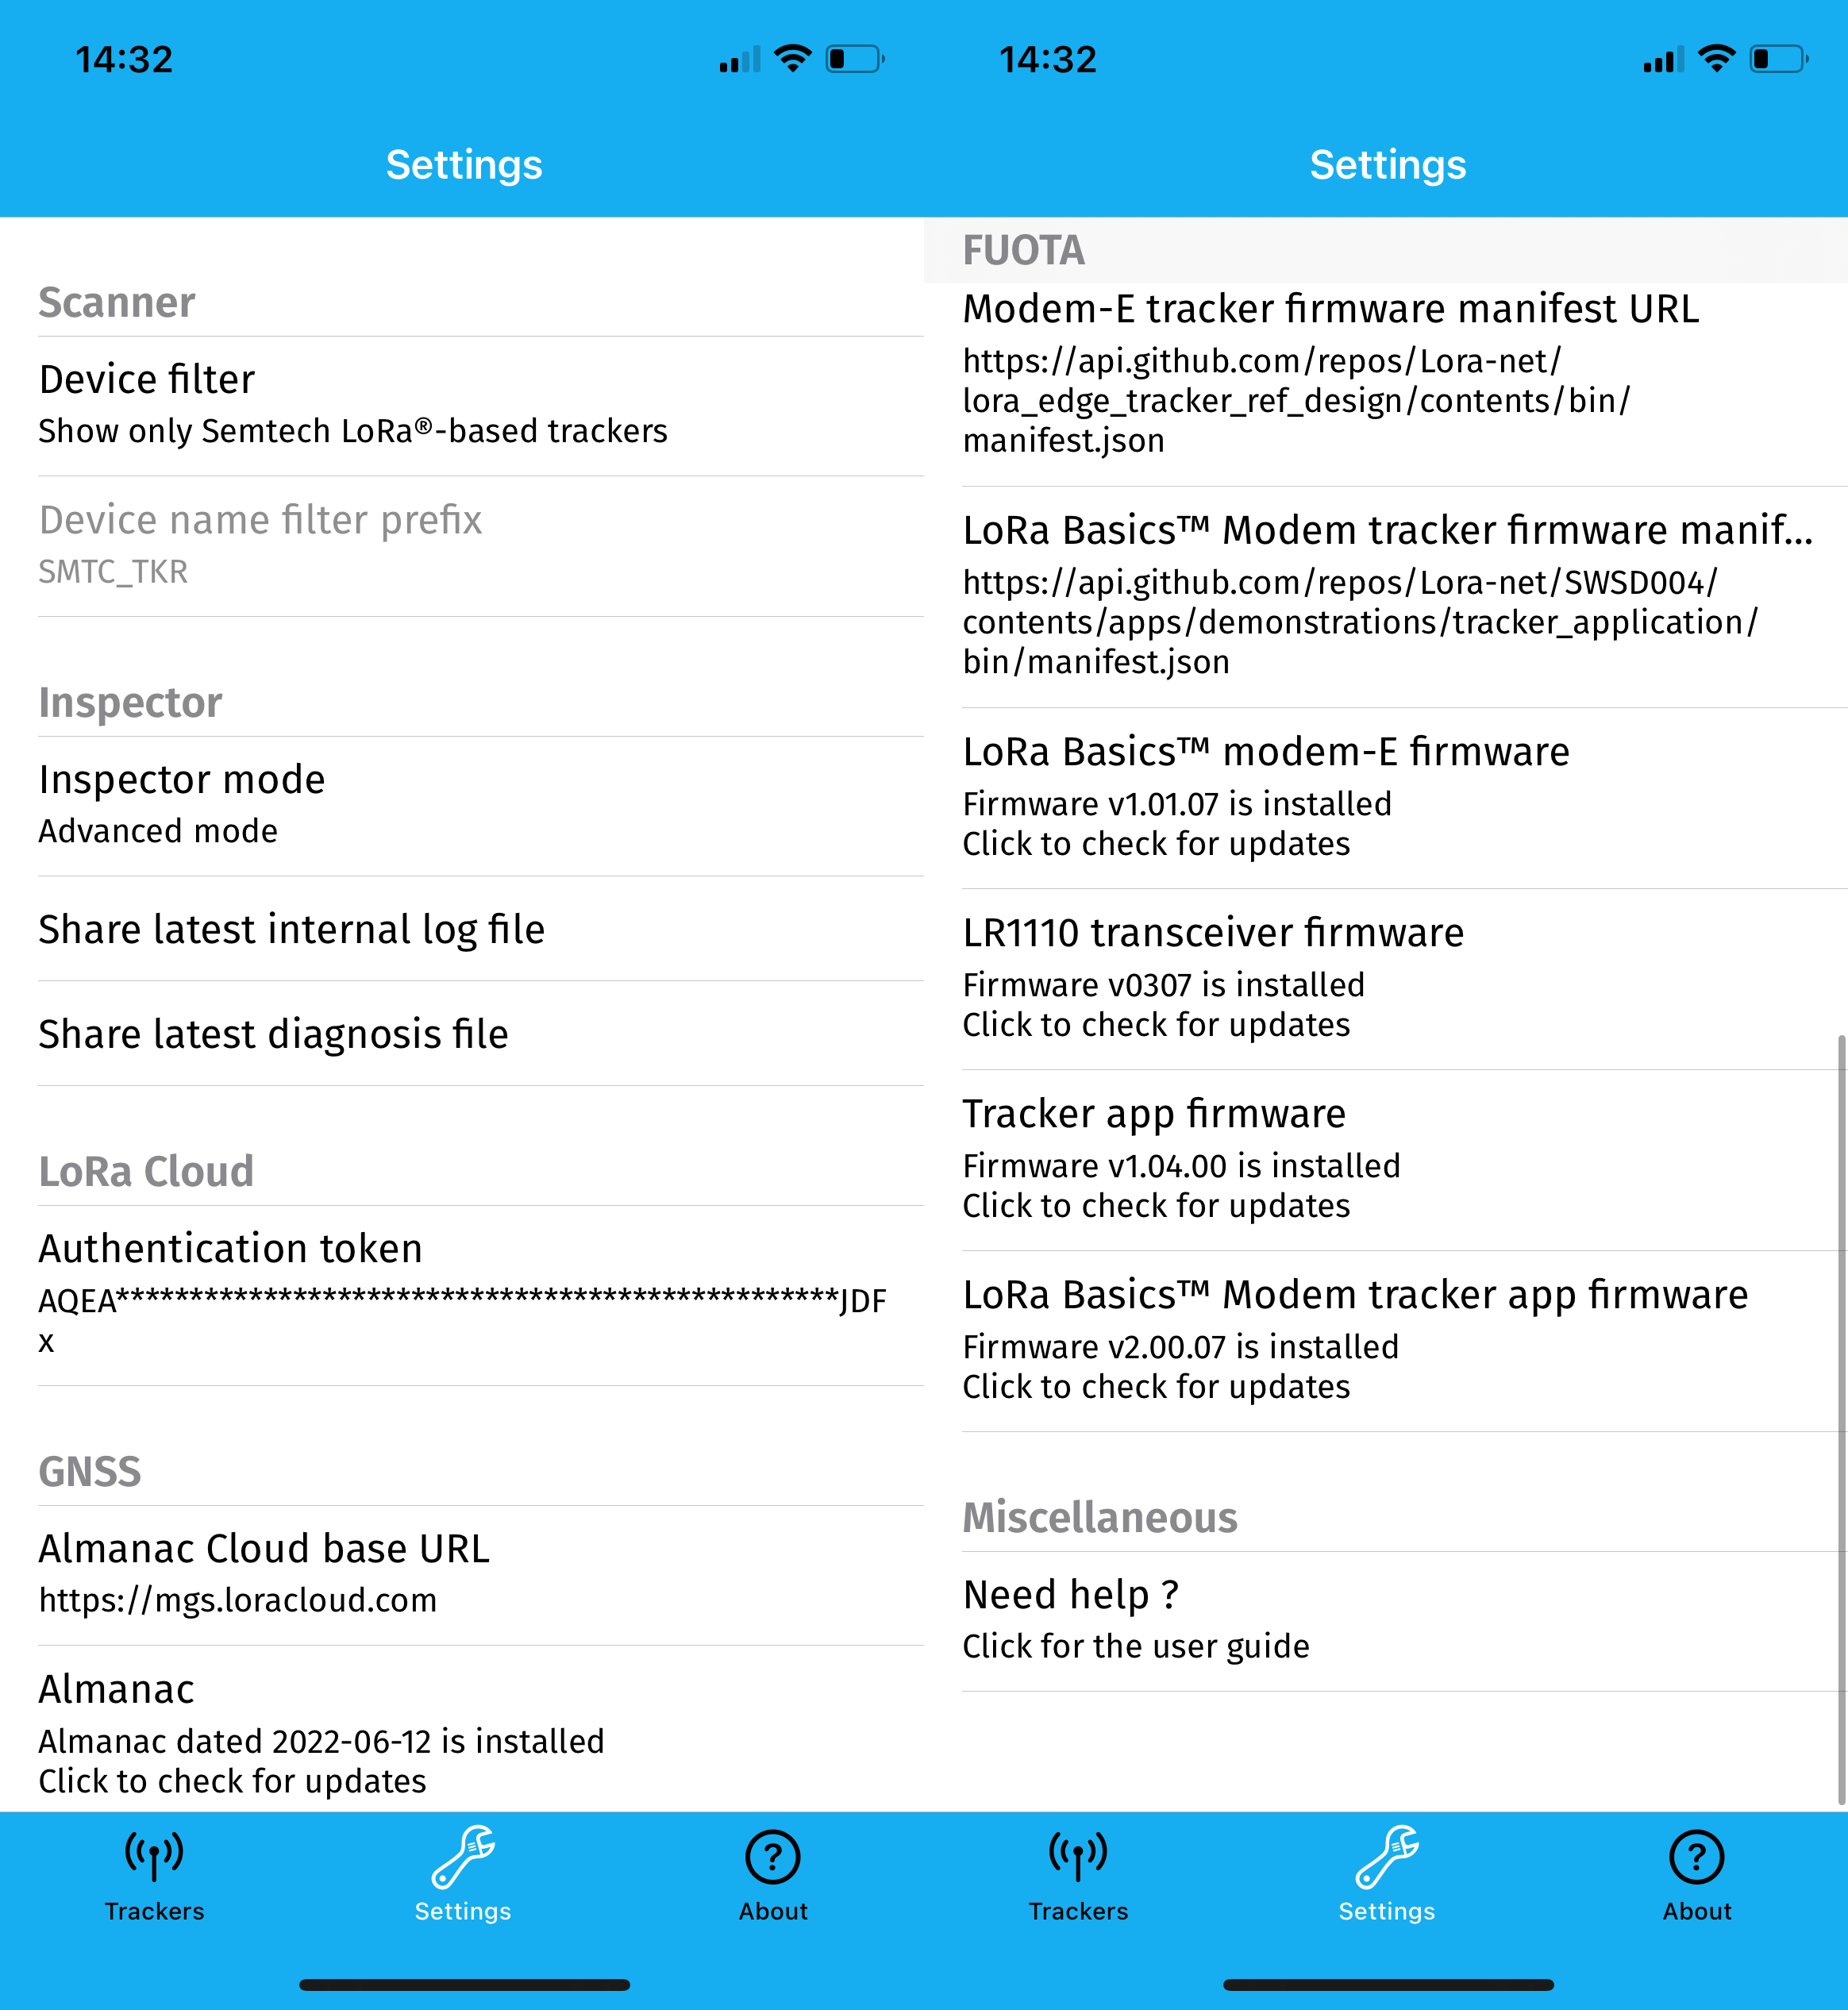
Figure 42: Settings - iOS*
Scanner Screen
The Scanner screen contains the following elements:
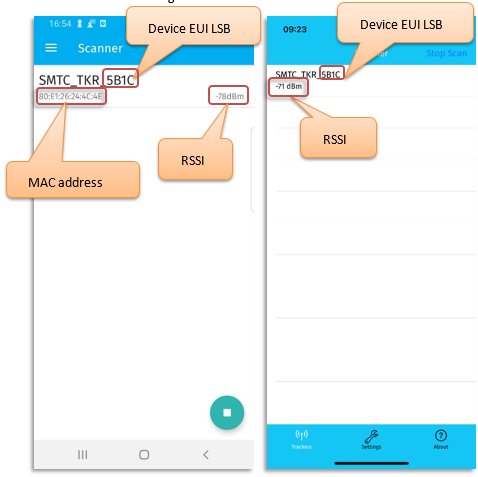
Figure 43: Scanner (Android on the left, iOS on the right)*
Advanced Configuration Settings
Users can access all parameters from this screen. LoRa Edge Config has several features and functions. It can also update both the LoRa Edge Tracker Reference Design application firmware on a device, as well as the modem firmware.
The Versions and FUOTA section displays the following information and update functionality.
Application firmware version: LoRa Edge Tracker Reference Design firmware application version (Major/Minor/SubMinor).
Application firmware Type: Type of the application firmware: either Modem-E or LoRa Basics™ Modem.
Function – Update Application firmware: Updates the application firmware when an update is available. When the application firmware is updated, the Tracker is reset.
LoRaWAN Standard version: Wireless stack firmware version (the LoRaWAN stack version) (Major/Minor).
LoRa Basics Modem version: Version of LoRa Basics Modem in use.
Function – Update LR1110 transceiver firmware version: Launches a firmware update over the air (FUOTA) for the end node. When the firmware is updated, the Tracker is reset.
Hardware version: The version of the LoRa Edge Tracker Reference Design hardware.
Note
If a firmware update button is greyed-out, it means that the version is already up-to-date, or an update is in progress.
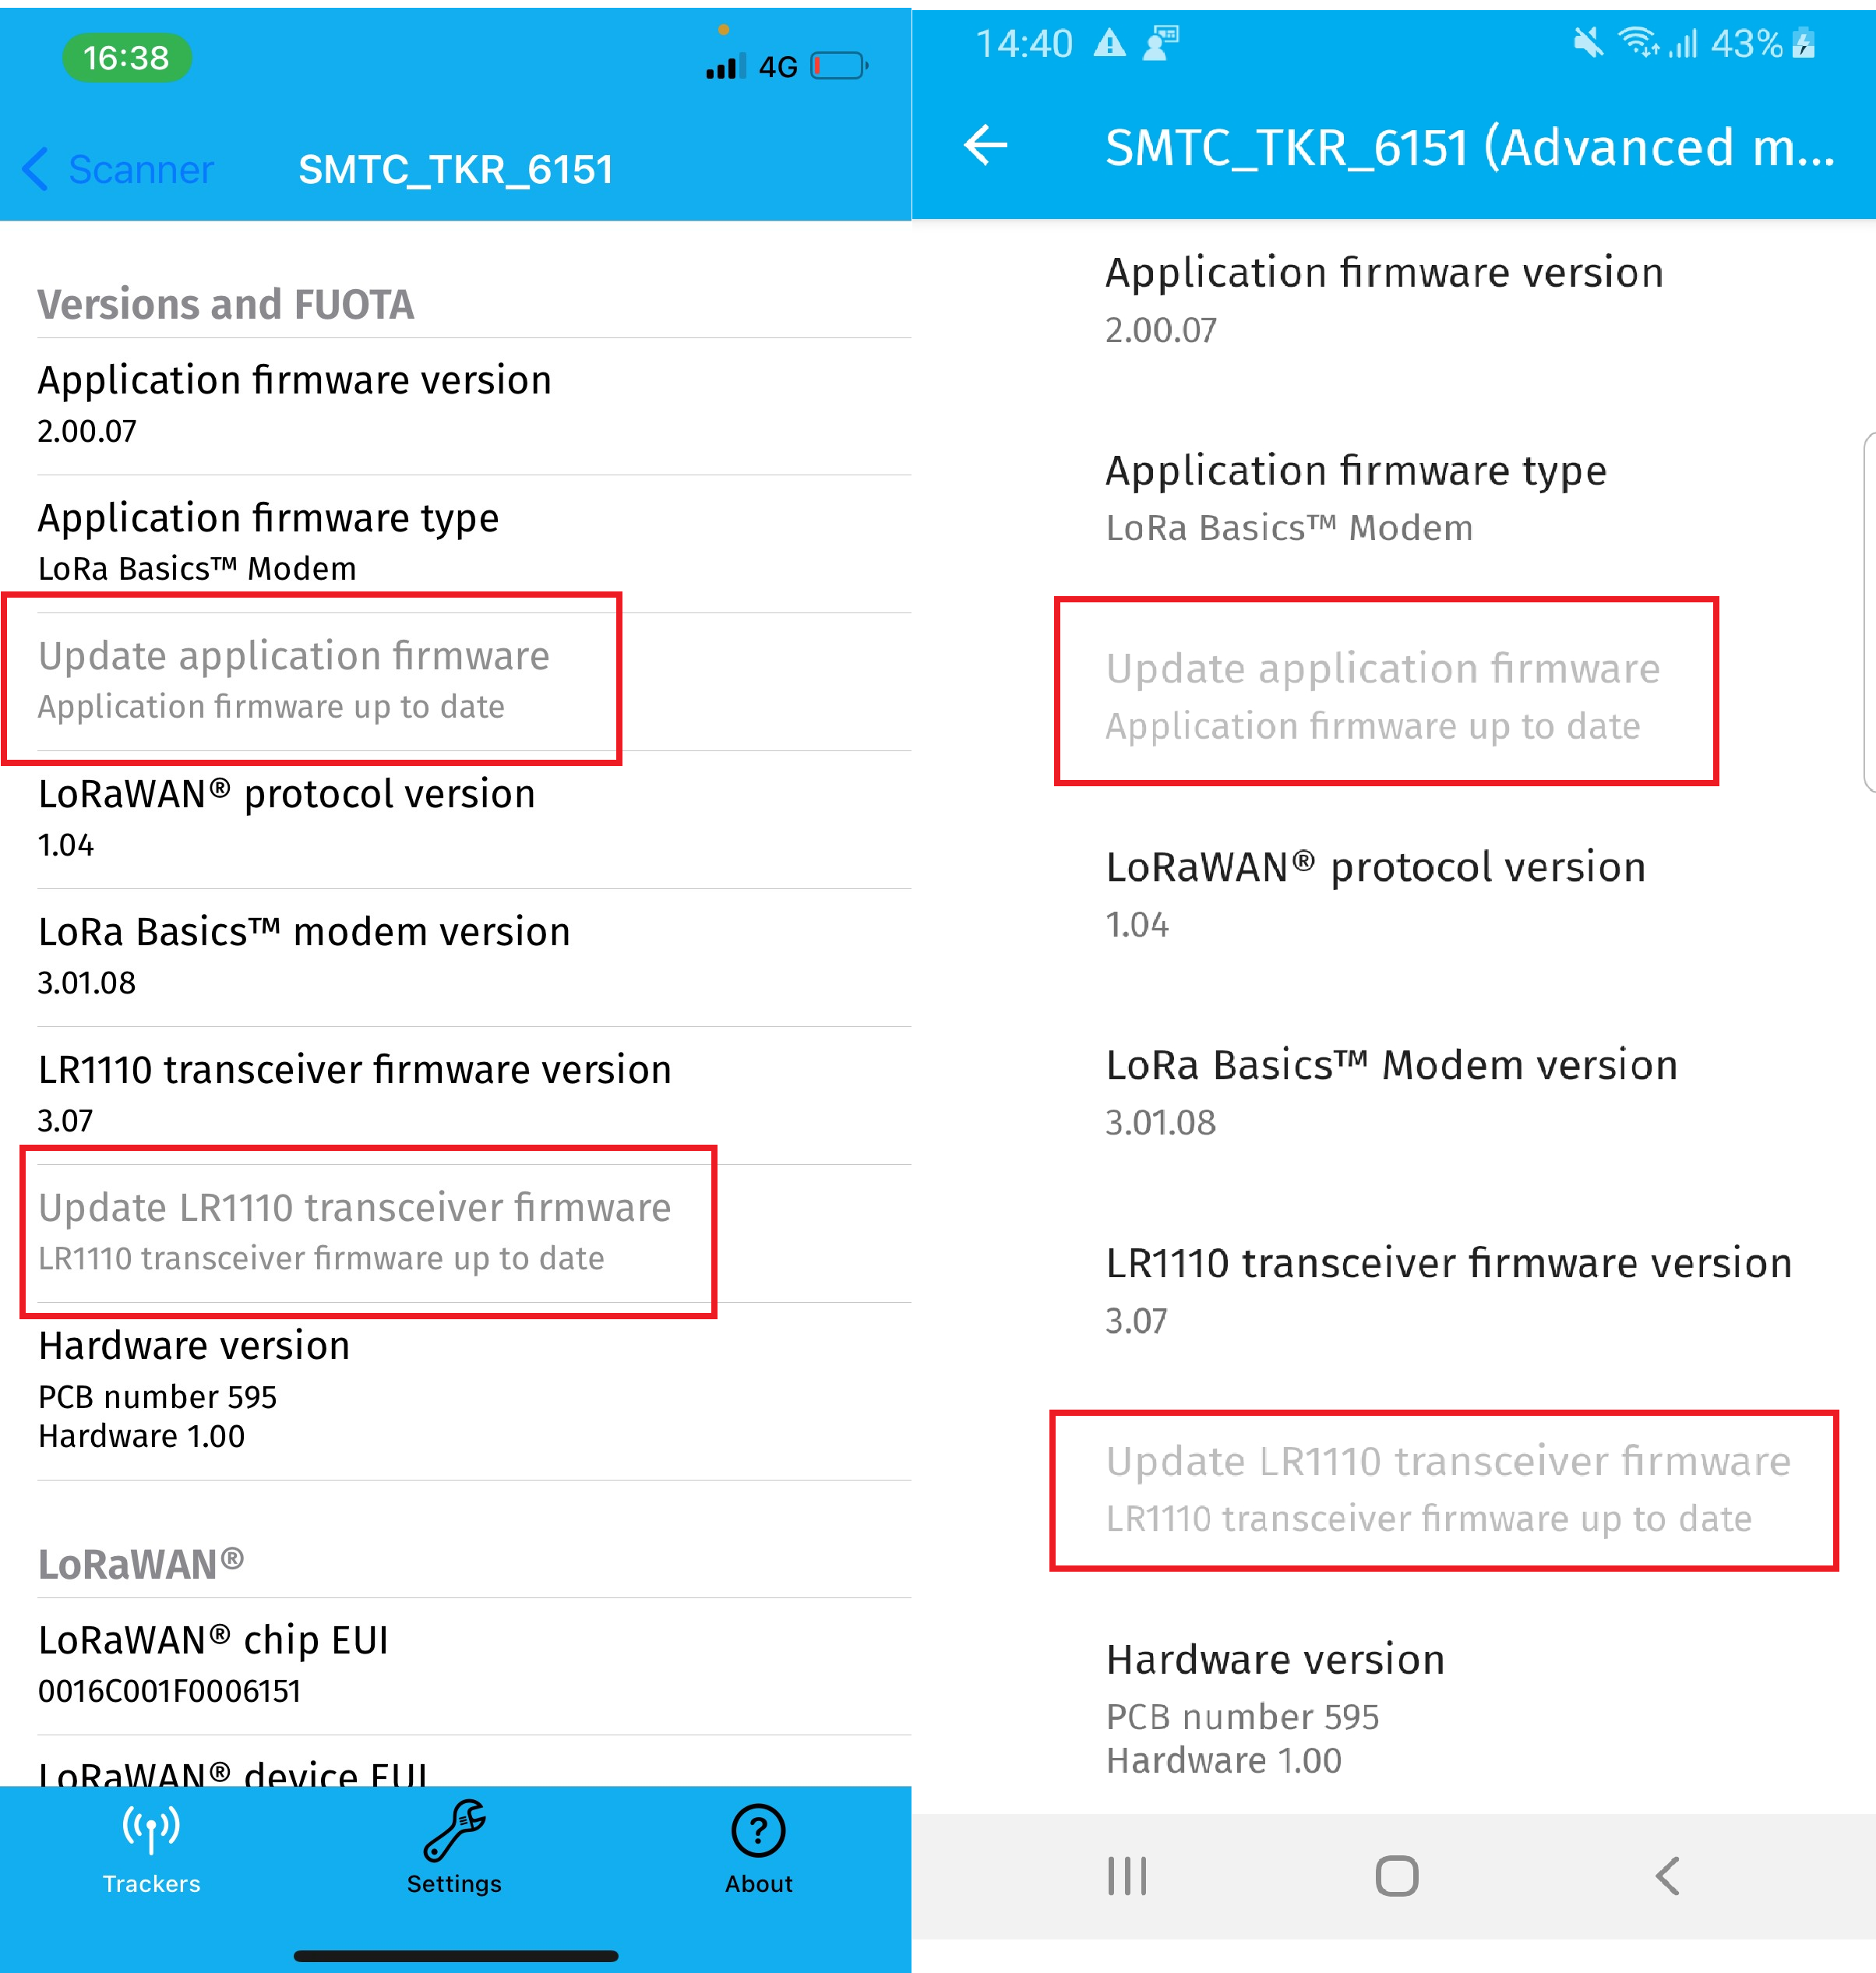
Figure 44: Version and FUOTA Settings (Android on the left, iOS on the right)*
The LoRaWAN® section displays LoRaWAN key information:
LoRaWAN Chip EUI: The Chip EUI.
LoRaWAN Device EUI: The Device EUI (if the Device EUI hasn’t been changed, this is also the Chip EUI). Changing this parameter resets the Tracker.
LoRaWAN Join EUI: The LoRaWAN Join EUI. Changing this parameter resets the Tracker.
LoRaWAN App Key: The LoRaWAN AppKey (when the Tracker doesn’t use the Semtech Device Join service). Changing this parameter resets the Tracker. If the Semtech LoRa Cloud join server is used, the AppKey is replaced with an asterisk (*).
LoRaWAN Region: The LoRaWAN region where the Tracker is deployed.
Semtech LoRa Cloud join server mode: Checking this box causes the Tracker to use the Semtech LoRa Cloud join server. Changing this parameter resets the Tracker.
LR1110 PIN code: The LR1110 PIN necessary for claiming the device on LoRa Cloud.
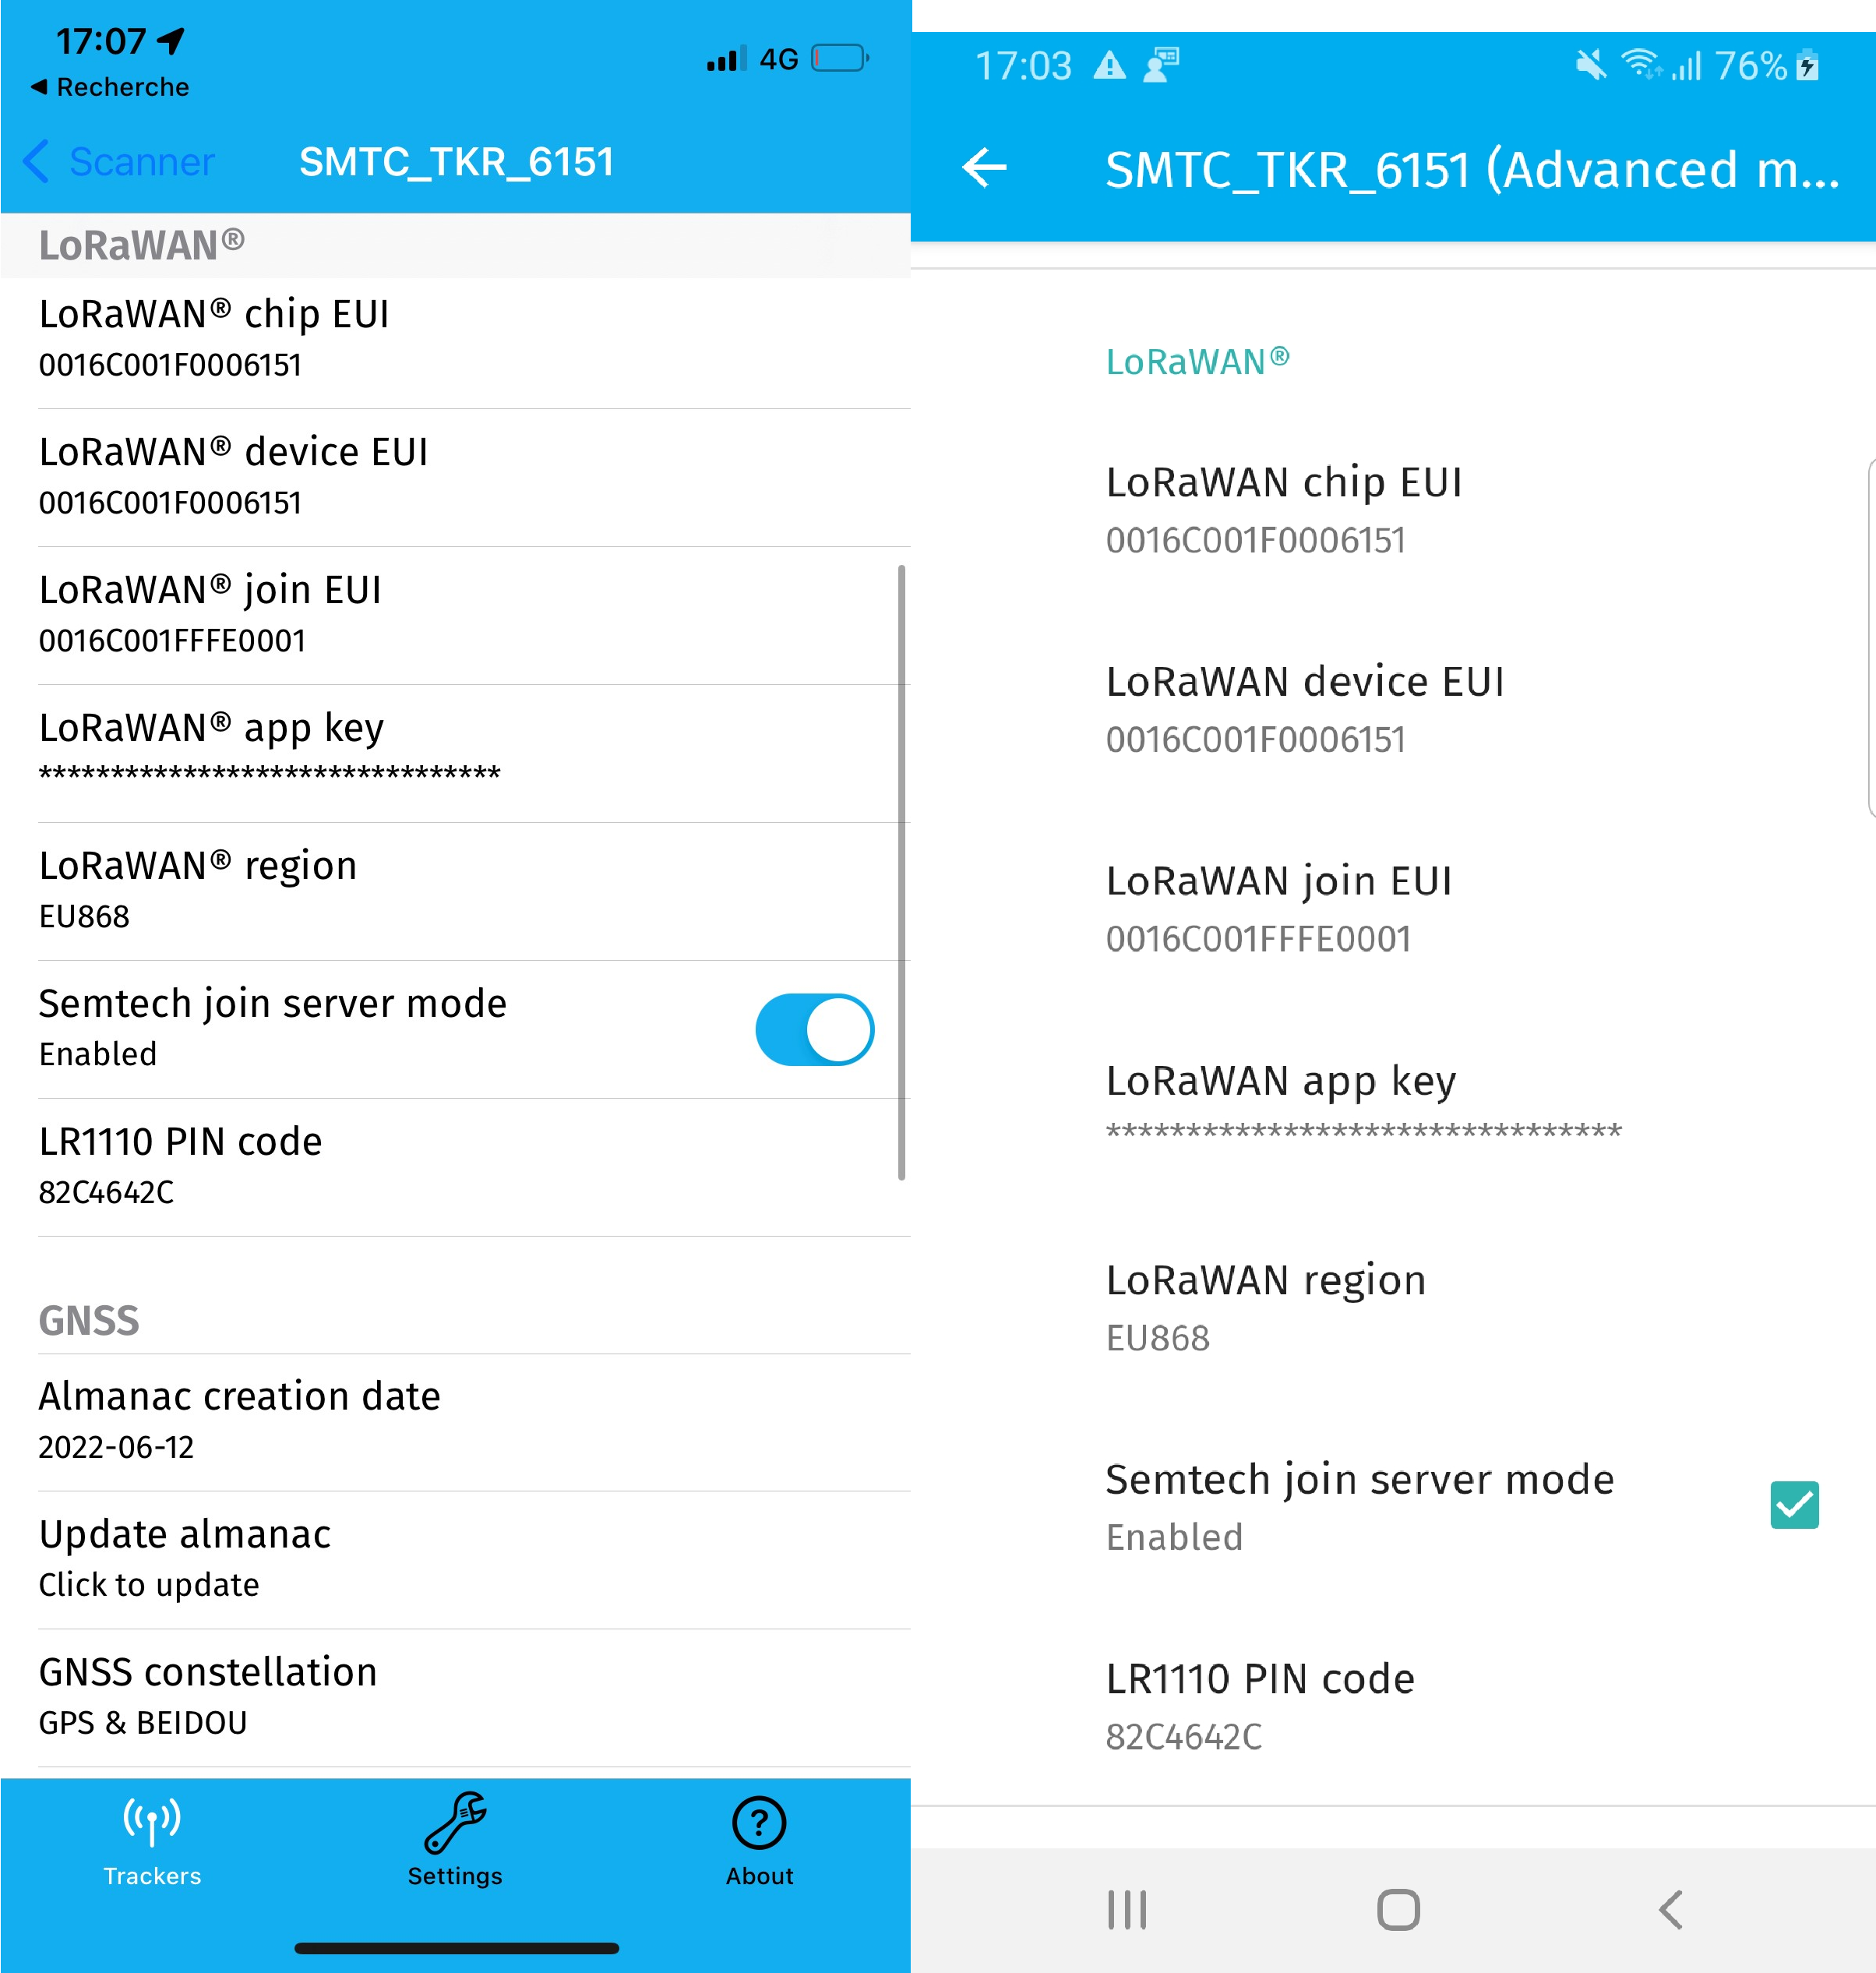
Figure 45: LoRaWAN (Android on the left, iOS on the right)*
To use GNSS with the Tracker, you must enable it by checking the GNSS feature checkbox in the GNSS section of the Settings menu (as illustrated in Figure 46), which updates the almanac.
Note
You might need to scroll down past the LoRaWAN section to see the GNSS feature checkbox.
The GNSS section displays the GNSS parameters and associated functionality, as illustrated in Figure 46, below.
Almanac creation date: Date of the most recent almanac update.
Update almanac: Used to automatically update the Almanac.
GNSS constellation: The GNSS constellation used; this can be GPS, BEIDOU, or both.
GNSS assistance position: The latitude and longitude used to aid the GNSS scan.
Set GNSS assistance position with last known location: Uses the last known GPS location of the mobile device to set the GNSS assistance position.
GNSS antenna: Allows you to select the GNSS antenna to be used for scanning. This can be PCB or Patch.
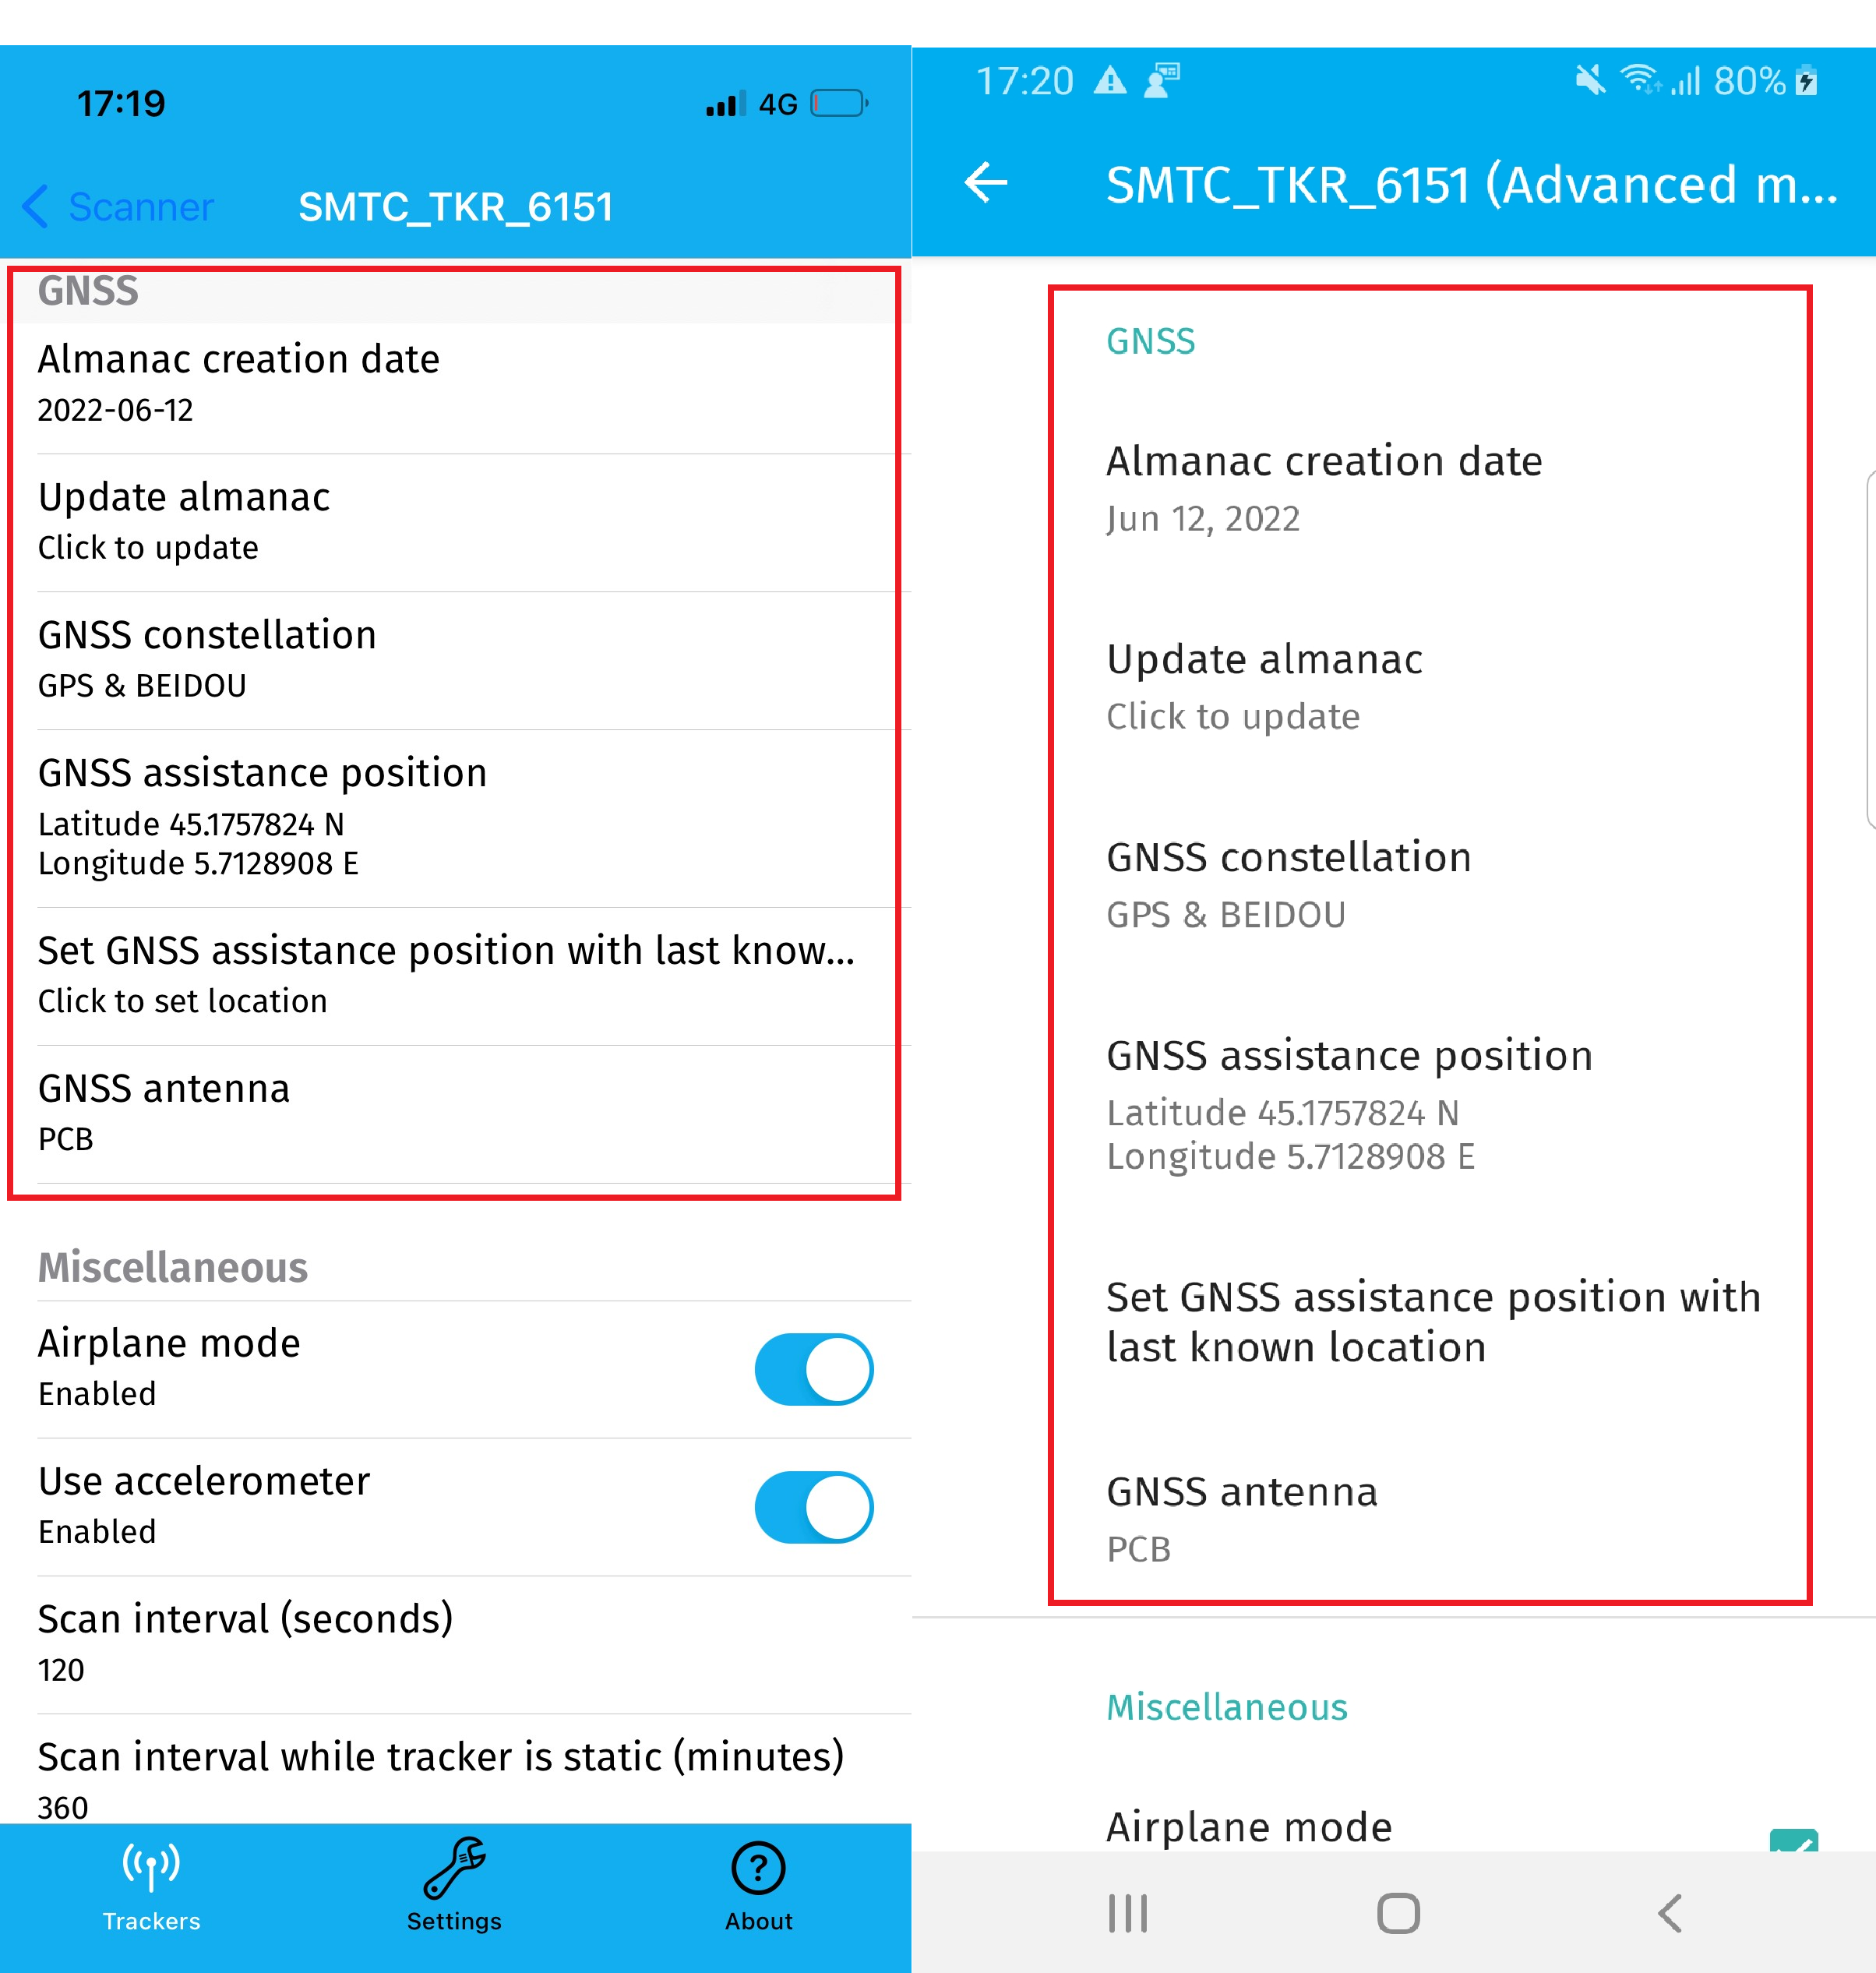
Figure 46: GNSS parameters (Android on the left, iOS on the right)*
You can set the device to receive position assistance data at your approximate location.
The input takes “+” for positive latitude (North) and “-“ for negative latitude (South).
Similarly, for positive longitude (East) use “+” and use “-“ for negative longitude (West).
The display ALWAYS shows “N” or “E” after latitude or longitude, respectively, even if you are at southern latitudes or western longitudes. The minus sign (-) sign however, takes precedence.
To facilitate setting the assistance position, you can use the Set GNSS assistance position with last known location option, as shown in Figure 47.
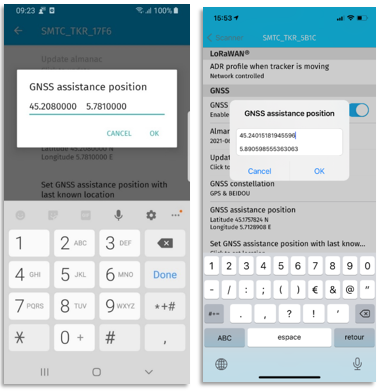
Figure 47: GNSS Assistance Position (Android on the left, iOS on the right)*
If you want to use Wi-Fi to scan for a LoRa Edge Tracker Reference Design, enable Wi-Fi scanning by checking the Wi-Fi feature box on the Settings page.
Note
You might need to scroll down past the GNSS section to find this.
The Miscellaneous screen displays additional parameters and functionality not categorized elsewhere:
Airplane mode: Enables or disables Airplane Mode. Changing this option resets the Tracker.
Use accelerometer: Enables or disables the accelerometer.
Scan interval when the tracker moves (seconds): The scan interval duration, in seconds, while the Tracker is moving. This interval cannot be guaranteed. It represents the anticipated duration of the scan attempt. The actual duration depends on whether the previous stream was sent, which itself depends on the radio duty cycle.
Scan interval when the tracker is static (minutes): The duration between keep-alive transmissions, in minutes, when the Tracker is stationary.
Board voltage: The voltage of the board.
Accumulated charge: The LoRa Basics Modem-E accumulated charge in mAh.
Reset accumulated charge: Resets the LoRa Basics Modem-E accumulated charge.
Internal log: Enables and activates, or disables and stops, logging.
Read internal log: Allows the internal log to be read.
Flush field test log: Deletes the internal log.
Internal log space left: The memory space remaining in the internal log as a percentage.
Reset board: Resets the Tracker.
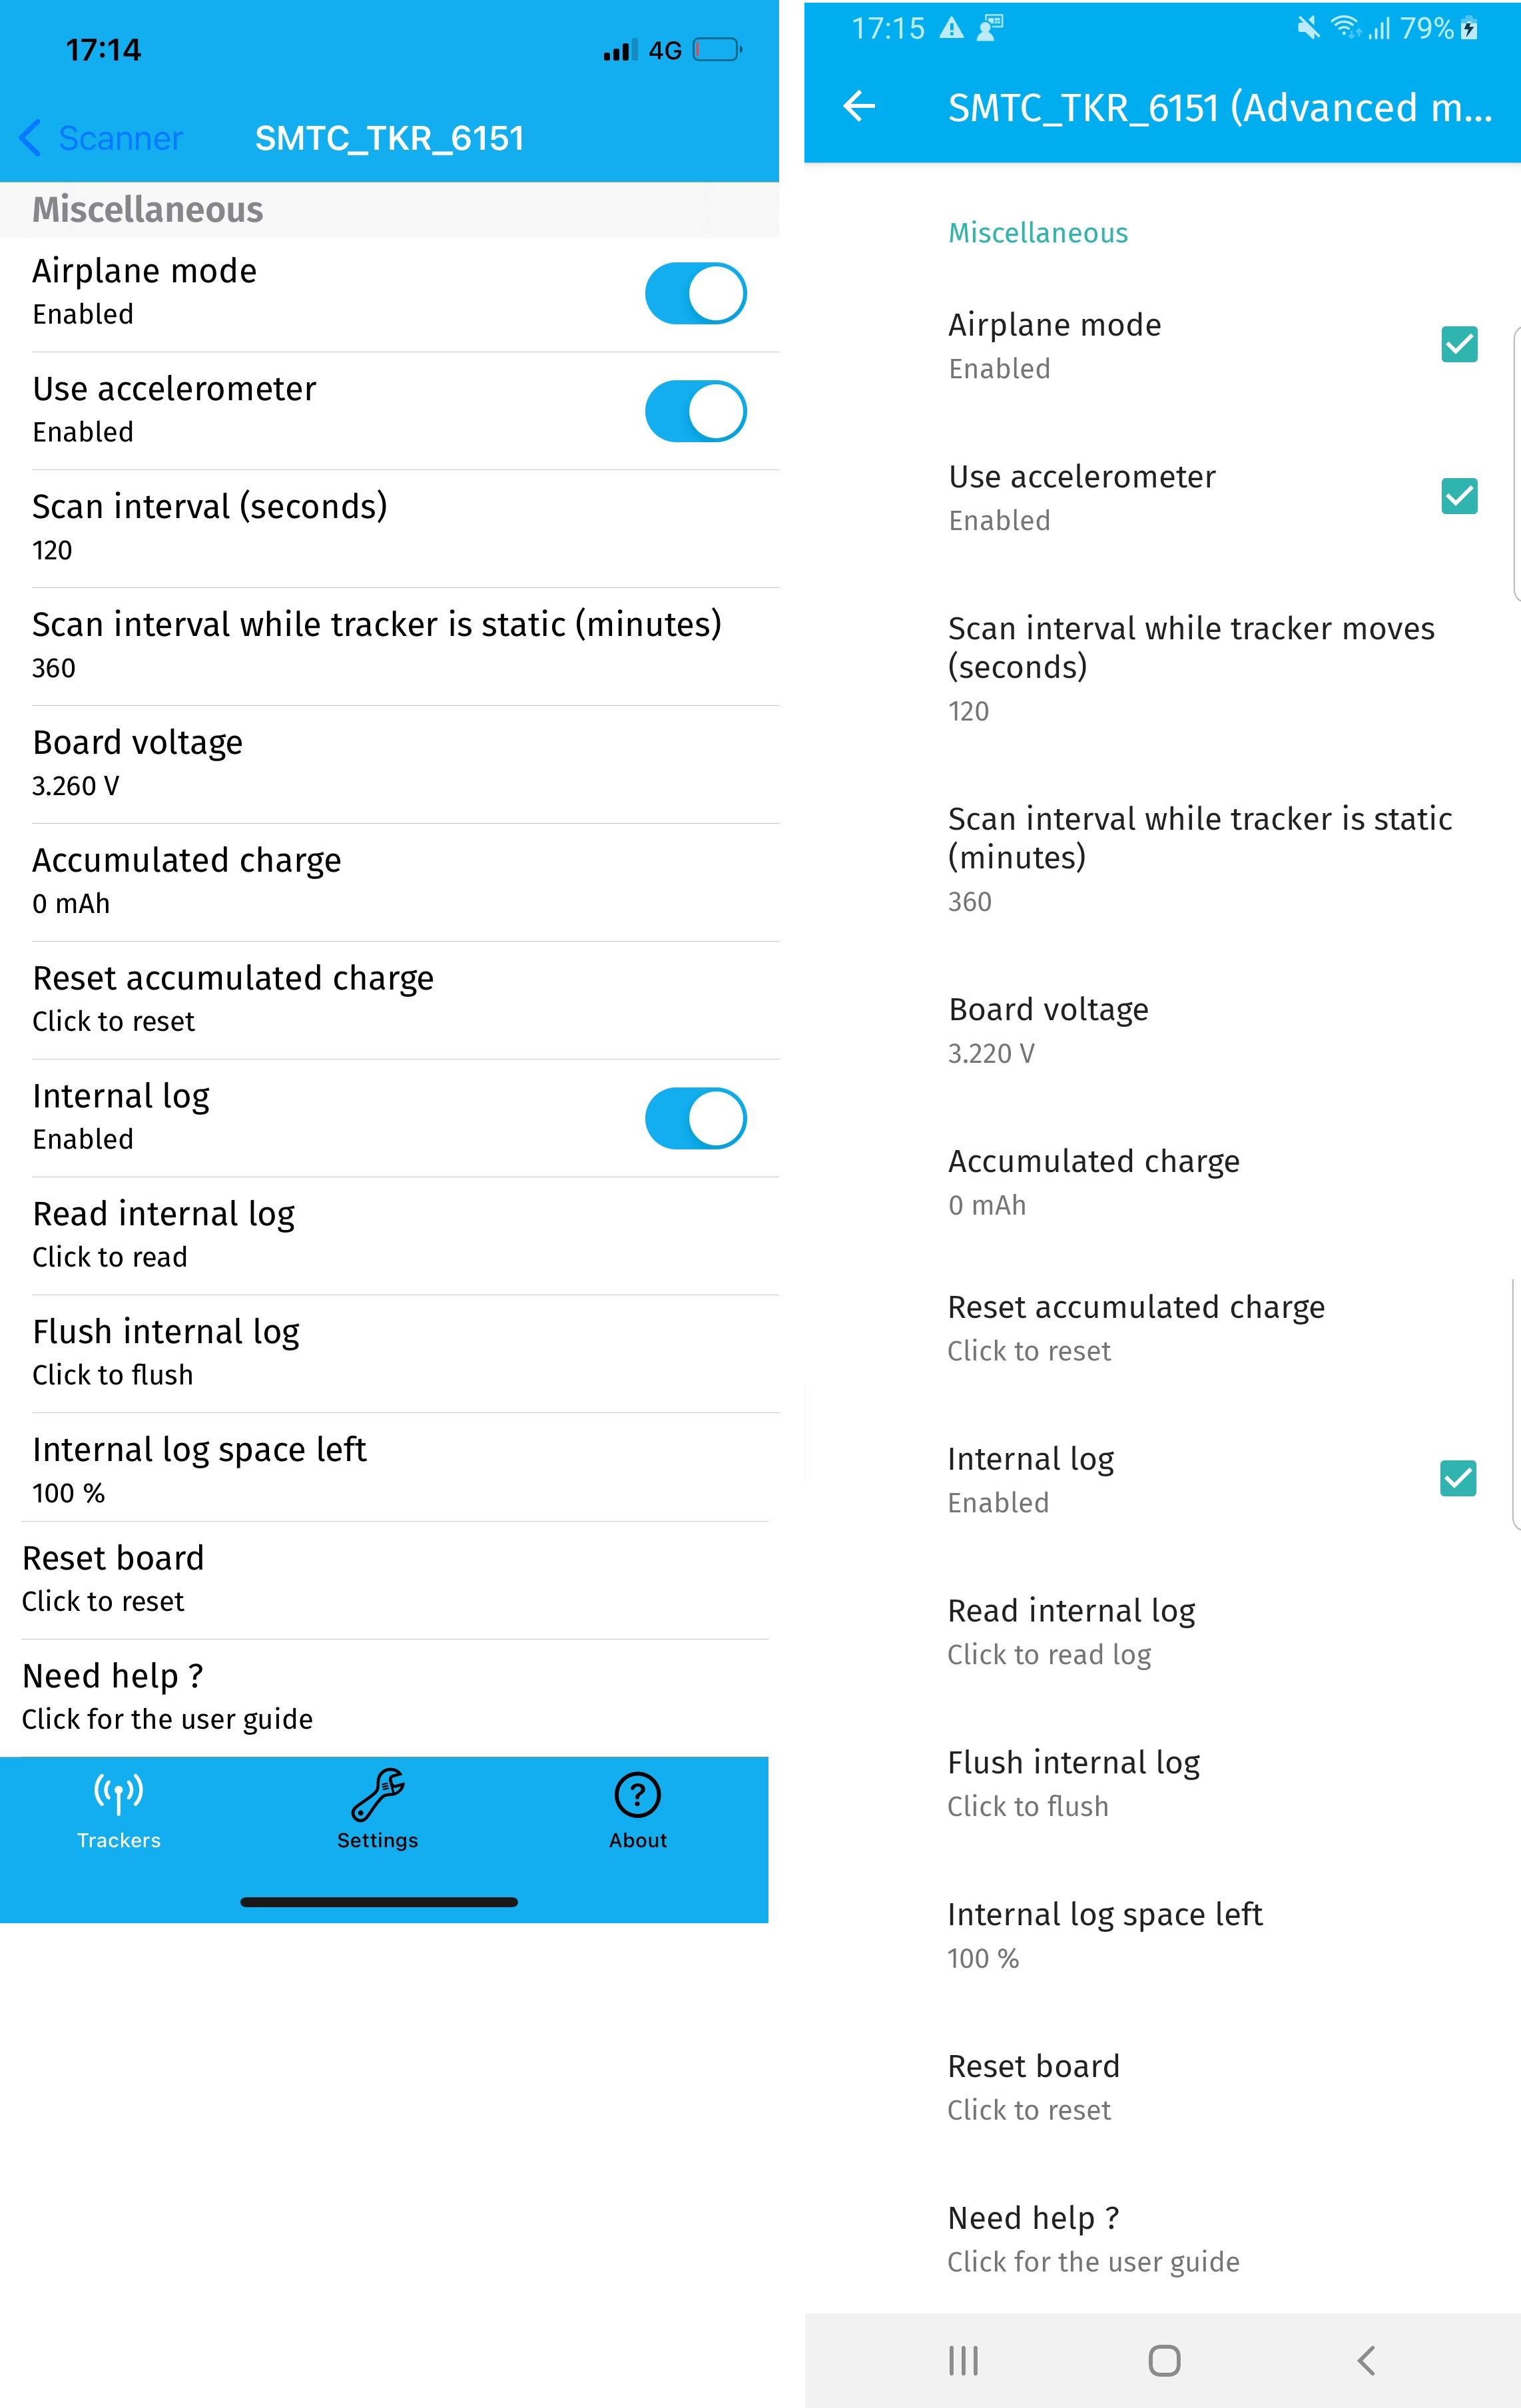
Figure 48: Miscellaneous (Android on the left, iOS on the right)*
Basic Configuration Settings
To facilitate Tracker configuration, you can use the Basic Mode setting. To access this setting, open the Settings page and set Inspector Mode to Basic Mode. In Basic Mode, the profile parameter is pushed to the Tracker.
The basic settings include:
Automatic update: If new versions of the application, firmware, or almanac are available, the application automatically updates each of them
LoRaWAN Device EUI: The Device EUI
LoRaWAN Join EUI: The LoRaWAN Join EUI
LR1110 PIN code: The LR1110 PIN necessary for claiming the device
Data rate: The data rate for transmitting packets
Low Data Rate:
Use accelerometer = enable
Scan interval = 1800s (30 min)
Medium Data Rate:
Use accelerometer = enable
Scan interval = 600s (10 min)
Default Data Rate:
Use accelerometer = enable
Scan interval = 120s (2 min)
High Data Rate:
Use accelerometer = disable
Scan interval = 30s
GNSS assistance position: The latitude and longitude to use for enhancing the geolocation accuracy of the Tracker
Airplane mode: Enables or disables Airplane mode
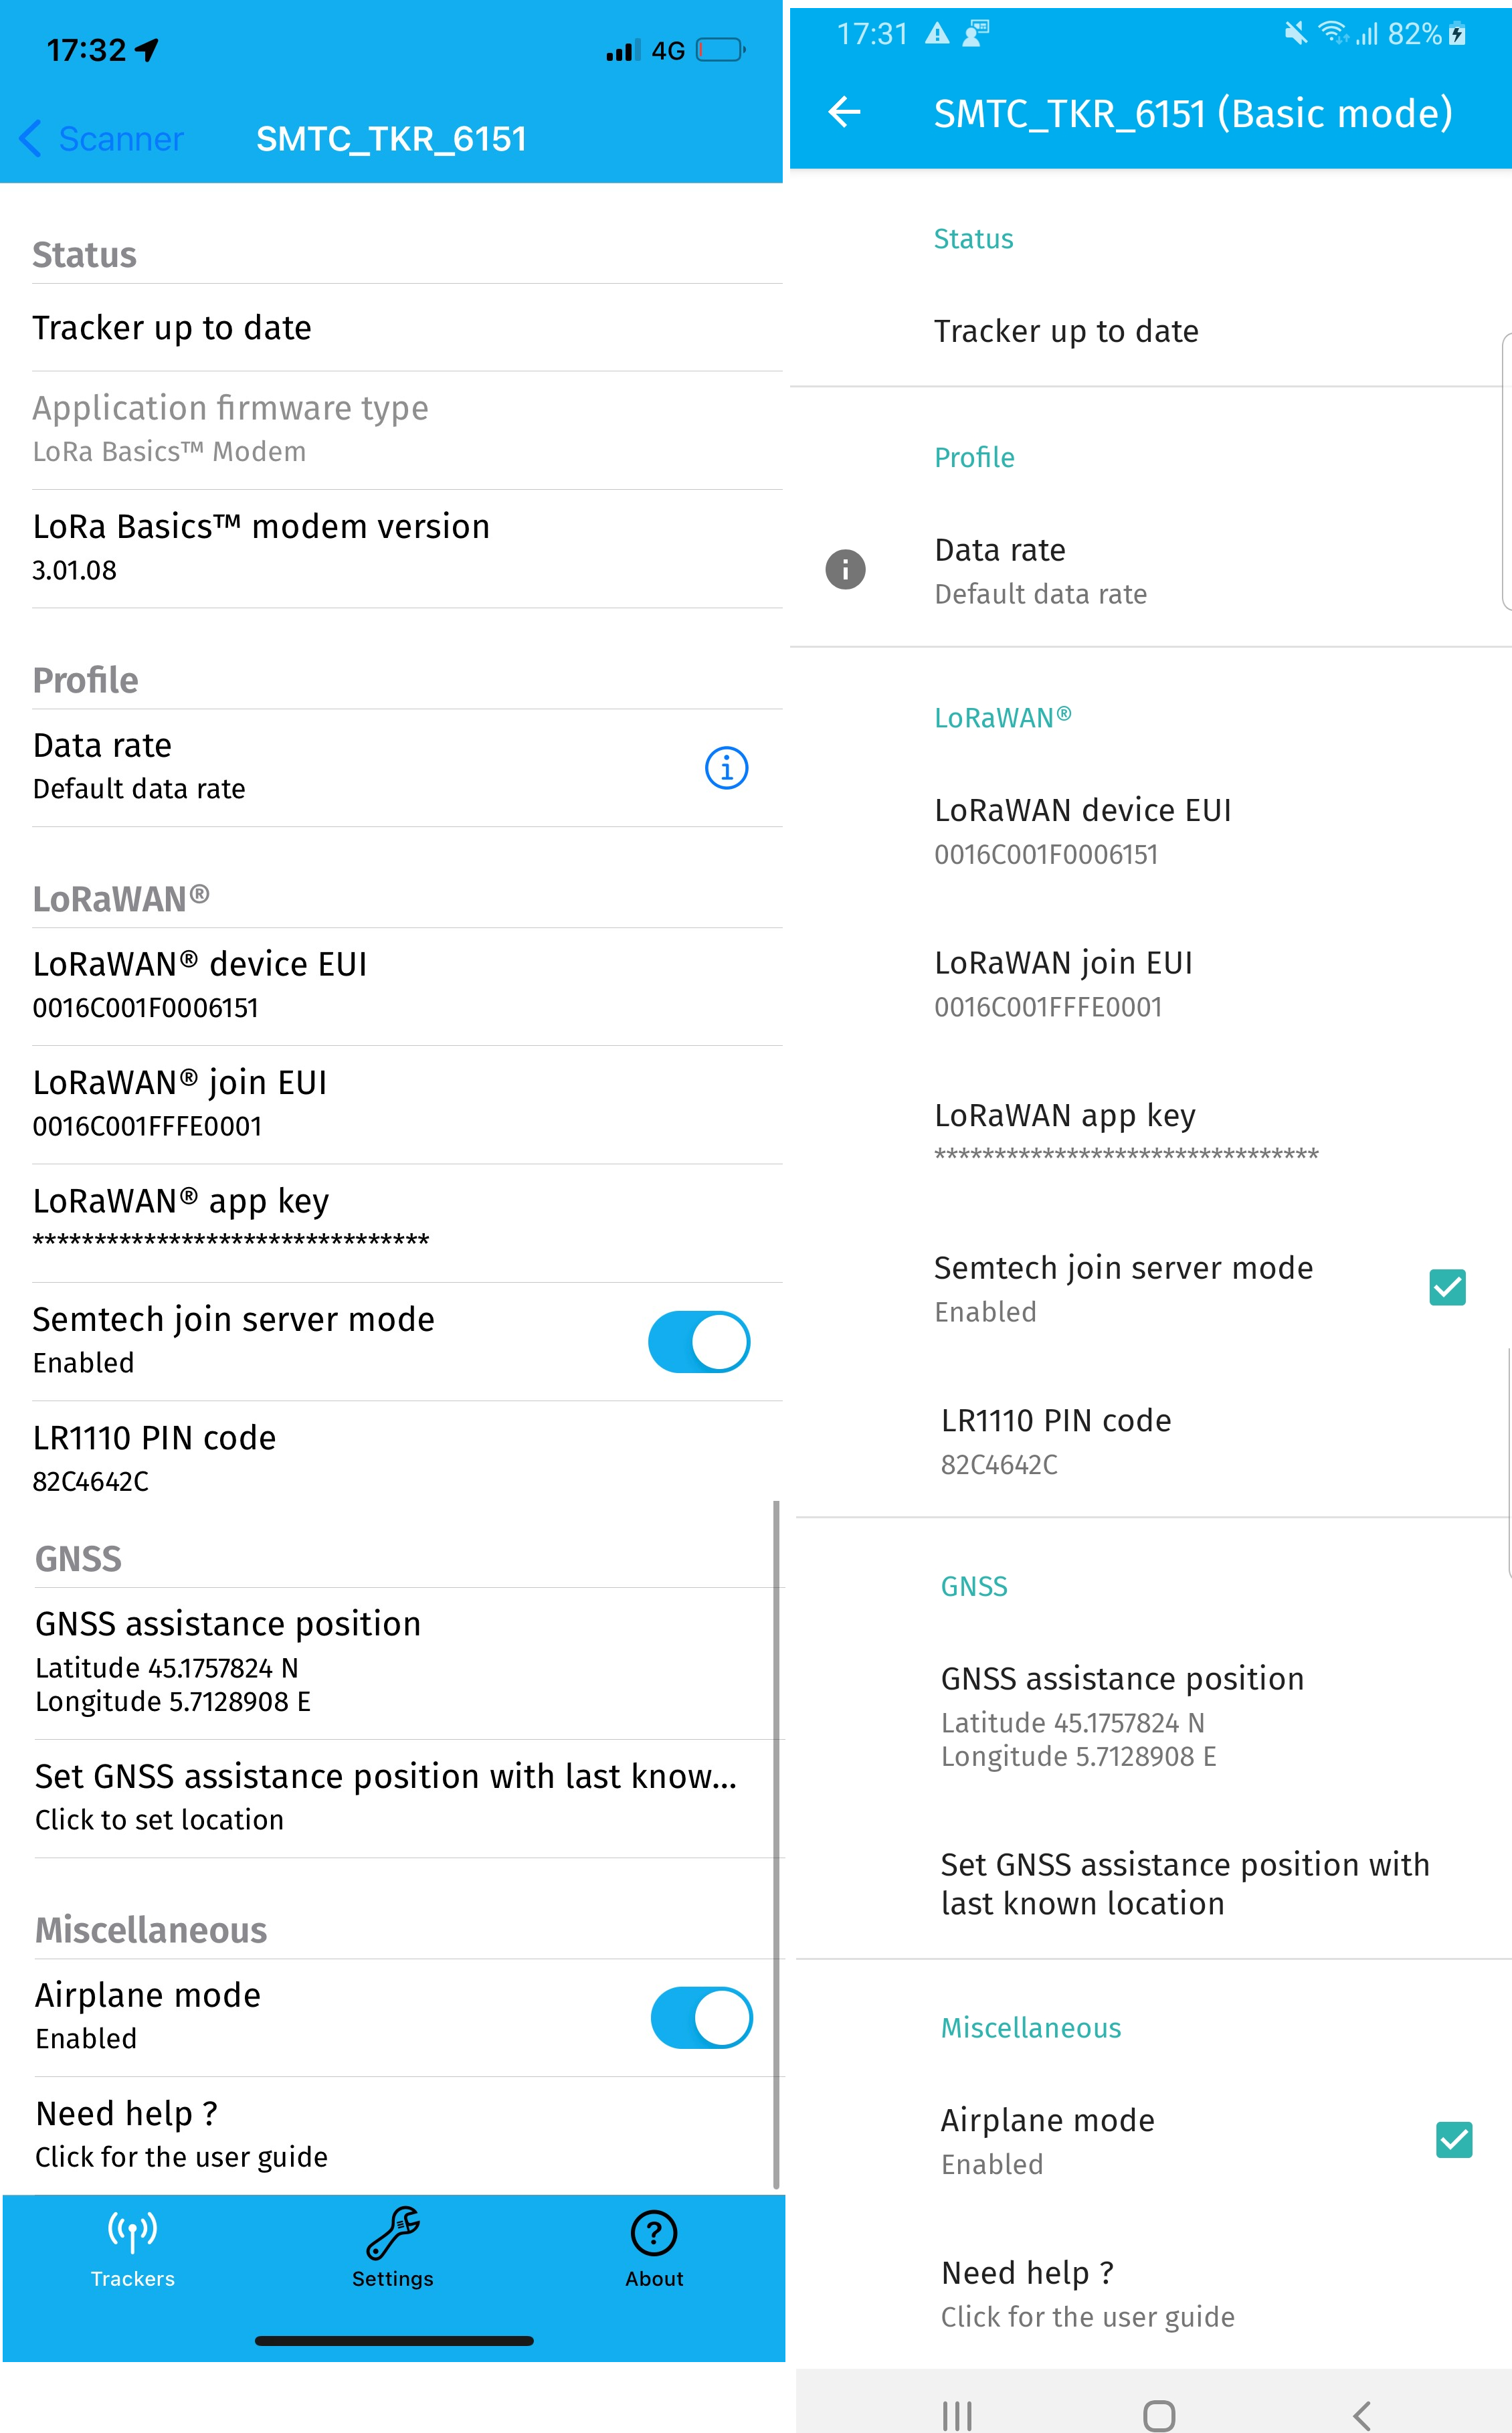
Figure 49: Basic Settings (Android on the left, iOS on the right)*
Activate the Internal Log
The Tracker can store the following data in its internal flash memory:
Wi-Fi passive scan results
GNSS scan results from both antennas
To activate the internal log, you must check the Internal log checkbox in the Miscellaneous section:
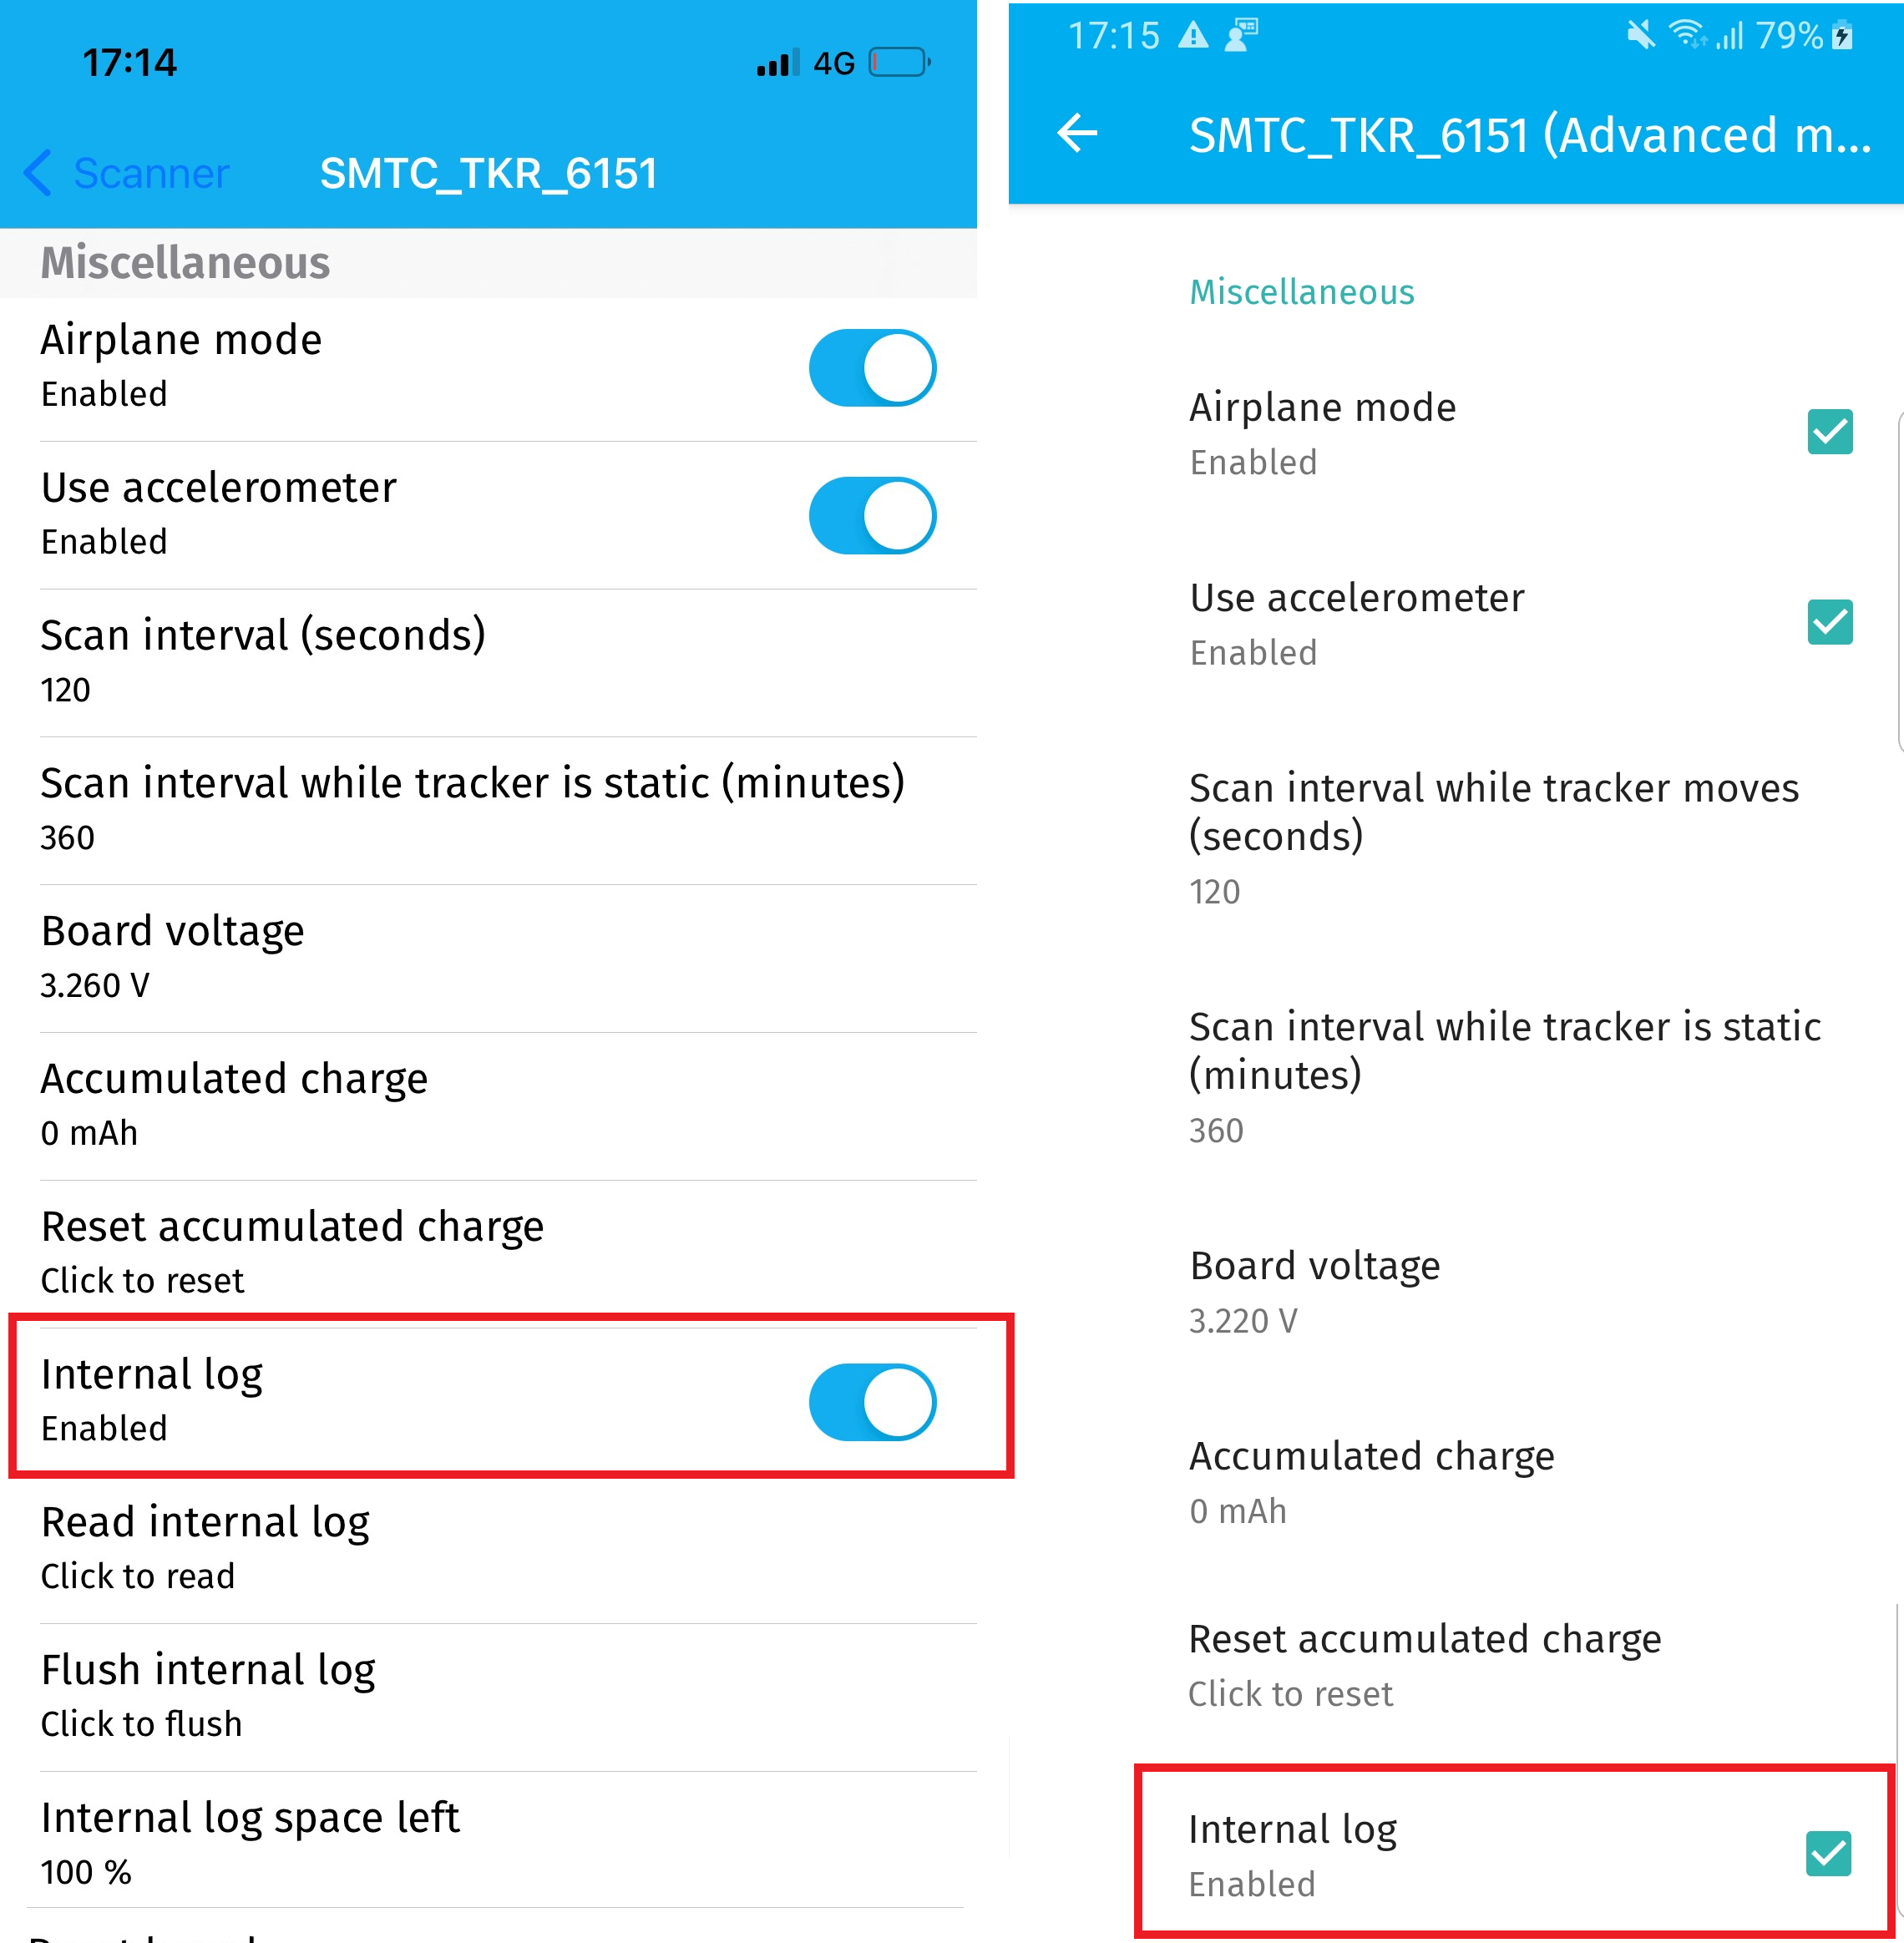
Figure 50: Enable and Activate Internal Logging (Android on the left,* iOS on the right)
Read the Internal Log
To read the internal log, in the Miscellaneous section, tap Read internal log. The app downloads the log from the Tracker.
Once the internal log is fully received by the mobile application, a pop-up dialog box (Figure 61) with the following choices is displayed.
SHARE: An email is sent (to an address defined by the user) containing the file internal_log_date.txt.
LATER: The log file and email are not sent. However, the log is stored in the USB storage and can be shared by clicking on Share latest internal log file in the settings.
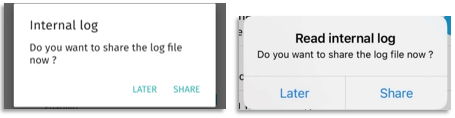
Figure 51: Internal Log Dialog Box (Android on the left, iOS on the* right)
Once the internal log file is received, it can be pushed to the LoRa Cloud solver using a Python script. The Python script parses and pushes the data to the LoRa Cloud solver, which resolves the positions and returns a *.kml file.
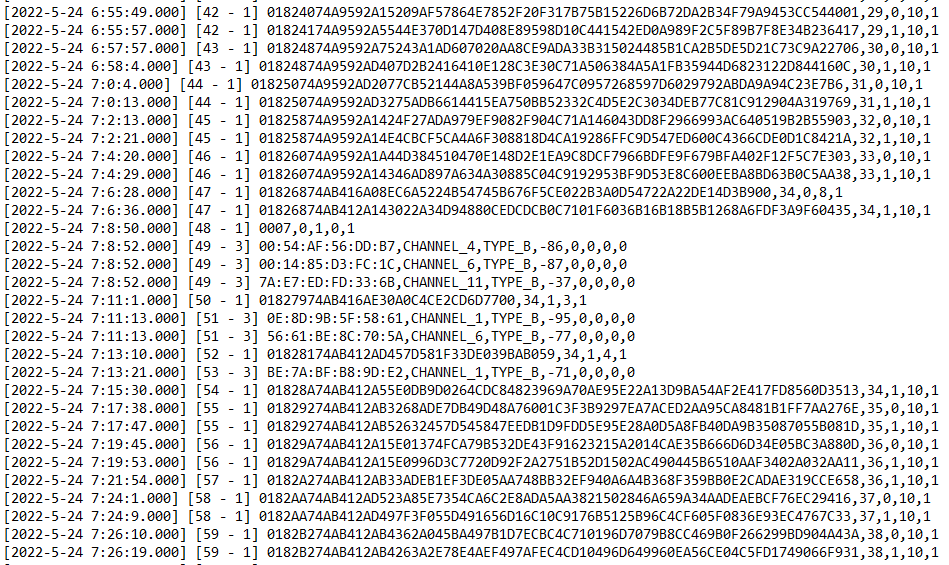
Figure 52: Sample Internal Log Content*
Each line in the log file has the following format: [Timestamp][Job counter – Job Type][DATA]
There are three possible job types:
GNSS NAV message on PCB antenna
GNSS NAV message on Patch antenna
Wi-Fi passive scan
Note
Data for GNSS is built as follows:
[NAV][Token][Last Nav of the  scan group][number of detected satellites][GNSS Middleware Profile]
GNSS Middleware Profile is 1 for mobile and 0 for static
Note
Data for Wi-Fi is built as follows:
[MAC][Channel][Type][RSSI][RFU][RFU][RFU][RFU]
To flush the internal log, tap Flush internal log. The log is flushed after the BLE connection ceases.
FUOTA Files through USB Storage (Android only)
On Android, LoRa Edge Config allows you to update the application and device firmware via files copied into the appropriate folder for your mobile device. For instance, >Galaxy S8/Phone/Android/data/com.semtech.android.trackerscanner/files.
To activate this service, in Settings, check the Get firmware from USB storage checkbox.
A files subfolder is created within the Android/data/com.semtech.android.trackerscanner folder of the USB storage on your mobile device.
Inside the files folder, a manifest.json file must be included. This file specifies the path of the firmware to be updated.
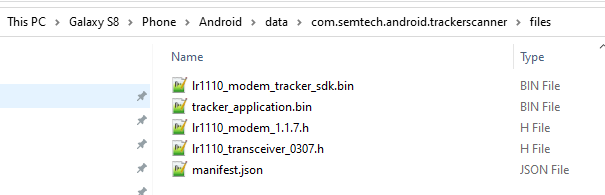
Figure 53: Contents of the Files Folder*
The manifest.json file must have the following format:
{
   "lbm_app": {
      "version": "2.00.07",
      "url": "tracker_application.bin"
   },
   "lr1110_transceiver": {
      "version": "03.07",
      "url": "lr1110_transceiver_0307.h"
}
Convert Modem-E Tracker into LoRa Basics Modem Tracker using LoRa Edge™ Config Smartphone Application
The LoRa Edge Config app V2 allows users to convert a Tracker running with Modem-E to a Tracker running LoRa Basics Modem.
Connect the Tracker to the app (from Settings, select Inspector mode and then Advanced mode). Next, click Application firmware type> LoRa Basics Modem> Migrate. The Tracker application will be updated to LoRa Basics Modem Tracker and the LR1110 will be updated in transceiver mode (v0307)
Once the LR1110 is updated, disconnect the app from the Tracker.
The Tracker will reset.
Configure whatever you want on the Tracker (a new context is created the Tracker), for example, configure the LoRaWAN keys, or take the app out of airplane mode, etc.
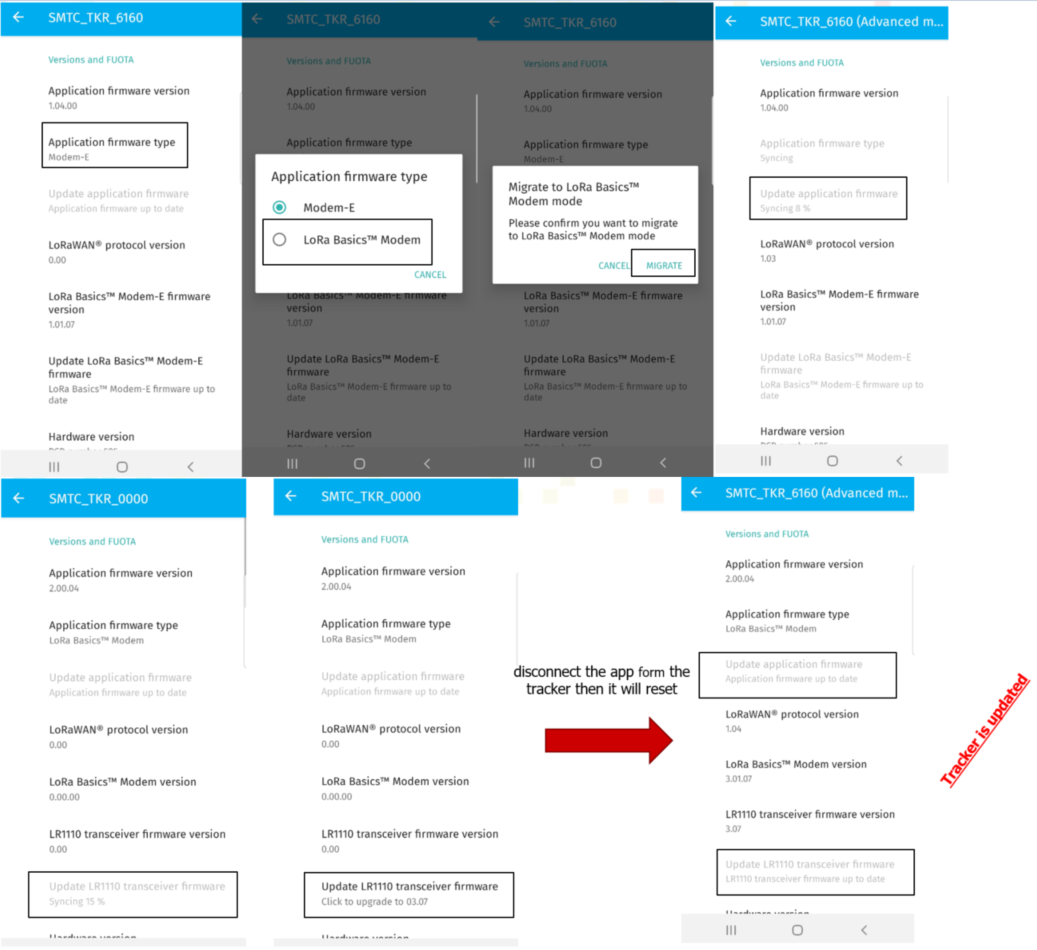
Figure 54: Tracker Migration*